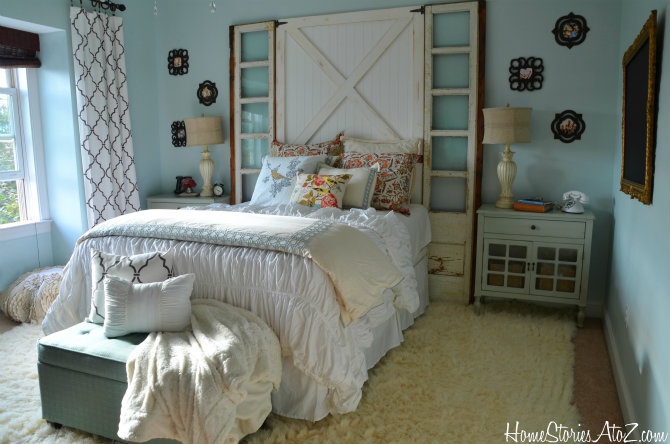
I recently revealed my barn door DIY headboard to you all and thought it was about time I give you a tutorial on how we built it!

The hardest part for us was figuring out the measurements. Matt and I stink at math and the brainiacs who decided to make dimensional lumber measure differently than the actual size stated didn’t help matters! FYI: a 1″x4″x 8′ is really a 3/4″ x 3 1/2″ x 8′.
We had two antique side-panel doors that were original to our first home. I previously had these propped in the corners of the bedroom but wanted to incorporate them into something more permanent. Layla suggested I use them in our headboard which sealed the deal for me :). Layla has never steered me wrong! The height of our doors and the width of the sheet of beadboard we used to back the headboard frame helped determine the dimensions.

Here is the breakdown of supplies and the total cost for you:

Once we had the pieces cut, we screwed them all together using mending plates. (You can find these in the hardware aisle. At Home Depot, they were with the gate-type hardware.)

You can see that we wrote notes to ourselves in pencil which piece was to go where. Doing this saved us a ton of time in reassembly after the boards were all cut!

I think this is the board that I cut that went flying across the room. I’ll admit it. This project made me a bit scared of my mitre saw. I didn’t have the boards properly supported while cutting (at least that’s what Brittany and Ana tell me and those girls know a thing or two about wielding saws!)

Once the frame was finished and painted, I nailed the beadboard into place by hand. (My dog chewed through my nailgun cord!) Then Matt screwed the frame into the two windowed-side panels using more mending plates.

To paint the headboard, I used General Finishes milk paint in Snow White. I didn’t use a primer on the wood first; I just went for it with the milk paint.


This was my first time using milk paint and it worked great and was easy to paint with. I used the pre-mixed kind because I didn’t want to have to deal with the mess of mixing.

I sanded a few spots on the headboard to create a worn look and used the burnt umber glaze over the top.

I forgot to add these to the “shopping list” above, but they were part of the total cost. I bought cheap gate hardware in silver and spray painted them ORB. I just hot-glued them in place because I was tired of drilling :). Yes, we might get hit in the head by a random piece of flying hardware in the middle of the night, but that’s the risk of laziness that I’m just willing to take right now!

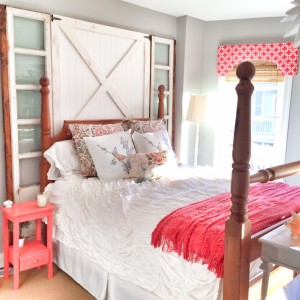
And after all of that, we finally have a headboard we adore! If you want to see more pictures of the completed bedroom, please click here.
Here is the updated look of the room:

Anyways, don’t end up being fined or spending a night in jail due to your own ignorance. Not only will this save you money (as most airlines charge for checked luggage now), but this will save you massive amounts of time in the baggage claim areas. From Hangzhou to Thousand-Island Lake: You can take the tour bus at Hangzhou West Bus Station to the Thousand-Island Lake.
I remember the first day I bought my miter saw 20+ years ago – I looked away for a second and knicked my finger. I can relate. Power tools need to be respected.
Great job on your headboard! Keep up the good work.
Hi there! May I ask the design name and store where you purchased your curtains in this photo? I have been on the hunt for this exact style for months.
Thank you!
Just saw your post from The Lettered Cottage and I just love what you’ve done with your headboard. The hubby and I made our headboard a few months ago and it was totally worth every minute spent. Just started following you, so I can’t wait to see more projects:)
I love this project I did a smaller one so the doors could go above the sofa in the living room and then did seashell garland. I really want to know where you got the bed spread?
You did a great job with this! I can’t believe for only $90 too!!! Awesome!!
awesome looking, since you’re enjoying woodworking, keep your eye open for a “biscuit joiner” and you will be in heaven, this would replace the need for the metal plates. it is an addictive tool 😉
Wow!! What a GREAT idea & a truly one of a kind headboard 🙂 I laughed when you admitted you glued on the hardware, who says there’s anything wrong with taking a minor short cut?? LOVE it!& wouldn’t be surprised if you started a new trend!
This is so rustic and elegant…I LOVE it!!! I just love barn door projects. Can’t wait to do my own. Thanks for sharing:) Carrie
Love your headboard! I had the opportunity to buy a door, including the track, but hesitated a minute too long. Kicked myself ever since, it was $60, what did I need to think about! Now I can follow your tutorial.
I love this! You guys did a really good job 🙂 I love how the milk paint turned out! It’s next on my list of things to try!
Beth your heaeboard is fabulous-plus it has a great story behind it -memories of your other home and being built by both of you. Great tutorial! Thanks for sharing
That’s cool how you connected the 2 from your other house! Great tutorial 🙂
Beth, gorgeous indeed! You make it look so easy. Watch out for the flying hardware!!