As you know, I have been itching to paint my kitchen cabinets for a few YEARS now.

And as I know, some of you feel very strongly about keeping wood nice and woody. (I’ve heard you. Seriously, I have. No need to tell me again.)

My cabinets would have been white years ago, but I respect this guy’s opinion more than anyone else’s and he’s not crazy about the idea. Actually, he’s just not crazy about the chaos that it will cause our family for the few weeks it will take me to paint!

But assuming he warms up to the idea this year (come on babe!), I thought it would be fun to share with you the best tips from some of the best DIY bloggers, on all the best ways to paint your kitchen cabinets. Best. I felt like I needed to say the word one more time for good measure.
So let’s get to it! Here is a list of cabinet painting tips from my favorite DIY bloggers:

Spraying your doors and drawer fronts will save a ton of time! If you don’t want to invest in a paint sprayer you can certainly just use the roller and brush method, or you could spray paint them with cans of spray paint like Not Just a Housewife! If you want to invest in a paint sprayer, here are some of the paint sprayers that were recommended:
- Wagner Power Painter This painter received very mixed reviews. Some DIY’ers had success with it, others felt that it was difficult to regulate the spray flow resulting in speckled/splattered results. At around $100, it’s by far the most affordable option which is appealing to me and might be worth the try!

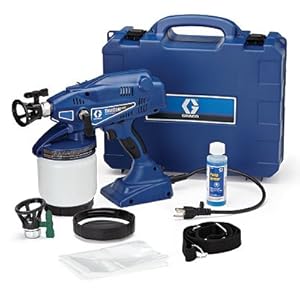
- Graco Magnum X5 Airless One DIY’er in the group owns and LOVES this sprayer. It also appears to have very positive reviews online. However it is more pricey at around $300.

- TrueCoat Plus Paint Sprayer This one was recommended for large expansive paint jobs and is reported to be very powerful. It was compared to a fire hose so might not be the best for small furniture jobs ;). It runs around $250.
- Earlex HV5500 Spray Station No one in the group had actually tried this sprayer but had heard good things about it from other DIY’ers. It is currently priced around $320 and the reviews I read online gave it 4 out of 5 stars.


The kind of primer and paint you use does indeed make a HUGE difference in your outcome. Oil based paints leave a wonderful finish but are harsher on your lungs, the environment, and your paint sprayer. There are pros and cons to all paints and everyone seemed to have their personal preferences so take all recommendations with a grain of salt. Here are the list of tried and true favorites:
- Zinsser 123 water based and Zinnser Stain Cover oil based primers seemed to come out on top. I have personally used both, and I prefer the oil based for it’s factory-like smoothness but the smell is STRONG. In fact, I just used this last night in the (very drafty) basement to prime some shelves for the bathroom and the entire house still smells. The 123 has mixed reviews on furniture/cabinets. You have to wait a long time for the paint to cure if you really want to do it right.


- Sherwin Williams Adhesion Primer This latex primer prevents the need to sand and sticks well to glossy surfaces. One DIY’er said that it is her go to primer for cabinets, built ins and furniture.

- STIX Waterborne Binding Primer Again, no one in the group had actually tried this primer but the description sounds similar to the Sherwin Williams Adhesion Primer. It is an acrylic/urethane primer and is supposed to adhere well to even the toughest and glossiest of surfaces. It cures in low temperatures, is said to dry with a “hard film”, and can be easily cleaned up with soap and water. I definitely will be trying it out in the future.


- Benjamin Moore Advance It’s new and people are really excited about it! I haven’t used it yet, but I’ve heard very good things. It is supposed to give you the best of everything. The washability and ease of a latex with the durability and smoothness of an oil-based paint. It contains a synthetic oil so mimics all the things we’ve come to love in an oil-based paint!

- Benjamin Moore Impervo It dries with a nice hard shell that several of the DIY’ers appreciated. It does require mineral spirits clean up that isn’t as convenient.

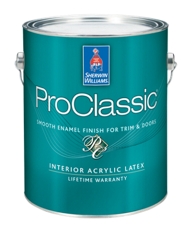
- Sherwin Williams ProClassic The water based ProClassic cures as hard as an oil based paint, and I’m told it goes on beautifully with either a roller or brush.

- Purdy Everyone seems to agree that your Purdy brushes are worth the investment. There are differing views on what sizes are best for which projects but if you’re looking for a quality set of brushes that will withstand the years, invest in some Purdy brushes.

- Small foam or small nap roller DIY bloggers seem to have many different favorite brands of rollers. I have used the Shur-Line trim roller on furniture before (recommended by Marian) with good results. I’ve also used several foam rollers on furniture and I’ve been happy with most. You don’t want to use a large paint roller for your cabinets or furniture and you want the nap on the roller (furriness) to be minimal for smooth results.


- If draping plastic everywhere is impractical or intimidating, it was suggested to brush paint your surround and island with primer and then use a paint sprayer for the doors and drawer fronts. Many also suggested that after everything is primed, use a roller/brush to apply your paint for the most even control.
- A few suggested priming and painting the surround/island yourself but contacting a professional to paint your doors and drawer fronts for you. This way you can ensure a professional finish on the most noticeable part of your cabinets without all the DIY work involved.
For some fantastic posts that give you step by step instructions on painting cabinets check out the following:
- How to Paint Your Cabinets (like a pro) by Evolution Style
- Painting Our Kitchen Cabinets by Beneath My Heart
- Painted Cabinets Revealed & a Video Tutorial by Miss Mustard Seed


Super helpful blog! So glad I stumbled on you! I’m planning to use Ikea cabinets in my laundry room and the planner says that I need to allow 2″ of space for any cabinet near a wall. Do you know if this if accurate and can I get by with less than that and still open the doors?
Thanks for the tips! It is amazing how ideas as little as these can make your life so much easier while you paint.
I want to paint my kitchen cabinets, currently a cranberry color probably with 2/3 different coats of paint,. Has anyone every used Annie Sloan or Milk Seed paints to do their cabinets? I think the article on best ways to paint your cabinets was very helpful and everyone’s posts too.
Thanks for the tips – but can I just say, I love your kitchen stools! Love them!
BEST TIP I EVER RECEIVED: Before applying the primer paint, apply (brush or roller) a coat of general purpose primer, like the kind used when painting or installing self-stick tiles to concrete floors. It comes in a gallon container, very inexpensive, and has a consistency of milk. It gives the wood a tacky base and dries clear. Then prime and paint. I did this on my old bathroom vanity before using latex paint. Not one peel or chip after high use.
Great post. I pinned it of course. Almost pinned your hubs because that is EXACTLY what my hubs is all about. Perfectly good enough wood, just leave it alone already. But…that wood isn’t painted white. Or yellow. so no, I can’t just leave it alone already (smile).
Pinned to my “just do it already” gallery. You know, for the priority projects I’ll finally get on like 12 months from now.
Bernadette (B3HD)
I’m in the middle of painting our kitchen cabinets too. I’ve done this in our other two homes as well. In our first home I used Glidden but for the last two kitchens I’m on the Sherwin Williams band wagon. The paint goes on so much easier and seems to coat better than cheaper brands. Plus it held up really well in our last kitchen which you can see at http://www.goldshoegirl.com/2011/04/kitchen-reveal.html.
Also the Sherwin Williams seems to have a 40% off sale every few months or if you join their customer program they will send you coupons and emails which make the paint very affordable. Plus I love that they keep track of all your purchases so I can go in and say hey what color white was the kitchen from 2005 and they can totally pull it up.
I’ve always done the painting with both rollers and paint brushes and I prefer the final coat with a brush. And it always takes me way longer than I think it will. So this time I am doing it one little section at a time so I don’t drive my husband crazy with the mess.
Great advice Beth! I’m in the same spot with hubby, and so far he’s not giving in about painting the cabinets, but when he does….I’ll be ready!
Ellie
Beth thank you for posting this!!! I painted my cabinets a few years ago black when Layla from Lettered Cottage did hers- and now Im itching to go gray!! I did so many things wrong the last time so this post is a great help-bookmarking it for sure! Happy Friday friend!!
DO IT!!!! you will LOVE it!!!!
My soon-to-be husband is the same – DON’T PAINT THE WOOD! EVER! WOOD IS BEST! LET’S LIVE IN A FOREST! Or something like that.
Good info, Beth. I am in the middle of painting my kitchen cabinets. I work full time, so it’s been a long process. I am not painting all of the cabinets at the same time, just the bottom cabinets. Once those are done, I will tackle the top cabinets. I removed the doors and the drawer fronts, so we don’t have silverware and other kitchen paraphernalia lying around on the counters. I used oil based bin for the primer. For the paint I used Porter Paints Glyptex. It is very expensive, $70 a can, but when it cures, it’s like enamel, very hard and durable. I used it to paint the built ins in my family room and they are holding up quite well. I used water based paint on my laundry room cabinets and the paint isn’t holding up very well. I am using a purdy brush and a velour roller for the cabinets, plus I add Penetrol to remove the brush marks. Color is delicate white.
While painting the cabinets I also refinished my kitchen table, staining the top and painting the bottom using Sherwin Williams Pro Classic. It dries quickly, which means you can’t overwork your brush strokes. But, you can re-coat after an hour. And the clean up is a breeze. With Glyptex, you must wait 24 hours before adding another coat, so it’s time consuming. And cleaning the brushes is a pain. I recommend buying a wire brush cleaner (ask for one at a big box store, they cost about $5). It makes cleaning your brushes a lot easier, which prolongs their life.
I’m interested to see how the Sherwin Williams holds up compared to the Glyptex.
My husband was reluctant for me to paint the cabinets, but ours are old and needed something and it’s just not in our budget to buy new cabinets right now. So painting them is an interim solution. They are not perfect, but a huge improvement over what we have. If you’re looking for perfection, I recommend buying (or renting) a sprayer.
Have patience. I guarantee that in the middle of this project you will get frustrated and wonder why you thought you could do this. It is hard, but you can do it and the results are worth it. Finally, don’t forget to sand in between coats. Very important if you want a good finish. Clean, prime, sand, paint, sand, paint, sand, paint, sand and then apply a clear top coat. I read a DIY blog and one professional cabinet painter said “we really aren’t painters, we’re sanders, too.” It’s that important, so don’t leave it out. Just pace yourself and you will eventually finish. And prepare for some chaos.
Hi, I am curious to know how the pro classic held up compared to the glyptex
We are in the midst of trying to figure out how to paint our kitchen cabinets, so thank you so much for all this good information! I would love to see a post on paint colors. There are so many shades of white! I think that is going to be the toughest thing to decide.
Great post! I was so chicken to paint our cabinets that we hired someone. It was about $1500 and that included hardware and new hinges as well. While it would have cost us less to DIY it, it was worth every penny! Dave and I just aren’t the DIY type for projects like that.
I hope you get to paint your cabinets! I know you would do an awesome job.
I am surprised that you did not mention anything abut Annie Sloan chalk paint? Has nobody used it to paint their kitchen cabinets? I used it hesitantly on our guest bathroom vanity and surprising enough it is fabulous and there was no need for sanding or priming and yes I did finish it off with wax. For those concerned about being green and having products that are 100% safe for all involved to include little ones there is also CeCe Caldwell mineral paints and wax that hit the market a few months ago. I use both AS and Cece and to me they are practically the same thing. Don’t tell them I said that though!;) Same principle though for both.
Cant wait to see if you actually win the battle of the cabinets. I want to do something with our kitchen and bathroom but am waiting to see if we will be moving in the summer or not.
Thanks for the shout out Beth! Posts like this are invaluable when doing research on how to do the job right! There is no one size fits all approach, and you covered the bases well! I can’t say enough good things about the Benjamin Moore Advance paint – it is AMAZING. I’m absolutely thrilled with the end result. 🙂
We did our cabinets last year with the BM satin impervo decorators white. The original cabinets were DARK walnut stain from the 70’s. Nasty. We actually used the latex bin primer and 2 coats of impervo. Holding up great 🙂
Just wanted to share that if you’d like to use a sprayer without the investment of a purchase, some models can be rented through the big box stores (Home Depot, Lowes) or local tool rental companies. Most are “by the day” rates, but it’s usually still cheaper than purchasing one. And, there is no need to find storage for yet another tool that typically won’t get much use.
The key would be to get all the prep done before you rent the unit to maximize the time you have it.
While I’ve never rented a sprayer, I have rented tillers, wallpaper steamers and other misc tools and have had very good success with them.
Just wondering what the best color of white is? Any suggestions?
Everyone seems to have a differing opinion on this one but Benjamin Moore’s Decortor White is nice. Some whites have too much of a blue tone to them which you typically want to avoid, and I definitely prefer white to cream. Your lighting will make a big difference in the look of the white as well. Melissa (Inspired Room) has a formula for Antique White that she loves and posts about here: http://theinspiredroom.net/2009/07/26/favorite-antique-white-paint/
I’m using Sherwin Williams Proclassic to paint my cabinets and love it! It IS pricey…but getting an oil-like finish (without having to use mineral spirits to clean my brushes) is priceless!
Great post! I’m just beginning to think about new cabinets or redoing the old ones, but sadly mine are cheap-o laminate ones. Does anyone know if they can be painted – or if the peeling laminate on the fronts can be removed and then painted? I’ve seen the new RustOLeum kits, but the look is a bit more “loving hands at home” than I wanted! Maybe I just saw some bad pictures….Plus, not sure if it would work on laminate.
Hmmmmm, if the laminate is in bad shape you might want to save your pennies for a cabinet refacing. However, you can fill the chips on your laminate with an epoxy filler. You could use most of the primers and paints recommended in this post on laminate. You want a primer that adheres nicely.
My husband was right there with yours. But since I was willing to do all of the work myself, what could he say? He admitted when I was all done that it looks much better. And it does! I used the Sherwin Williams ProClassic, a purdy brush and small roller. Alot of work, but I’m so pleased with it. It brightened up my kitchen like you can’t believe!
Good luck:)
here’s the link to my white kitchen transformation
http://small-n-simplethings.blogspot.com/2011/09/white-kitchen.html
Great Job!!! I noticed you went with deglosser vs. sanding. How is it holding up a few years later? LOOKS AWESOME!
Thanks Tommy! It has held up beautifully. There are a few tiny chips on the pull out trash/recycling cupboard because that gets the most use each day. And my husband was recently cooking with turmeric and just kept opening the spice cabinet in spite of turmeric covered fingers. The cabinet has a turmeric stain that isn’t responding to anything. Other than those two issues, the paint looks gorgeous. It was one of the best decorating decisions I ever made.
Thanks for the quick feedback! I never seem to find follow ups on projects a few years down the road and I’m very happy to hear your results. We will start our cabinets next weekend!
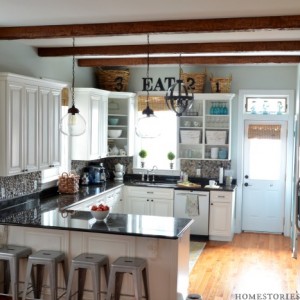
In case you want to see the most recent pictures of the kitchen, you can check them out here: http://www.homestoriesatoz.com/christmas/christmas-kitchen-decorating.html This was the kitchen this Christmas. Good luck on your cabinets! Be sure not to rush dry time between coats. 🙂
We painted our wood cabinet a number of years ago. They came out fine. They have been done a second time now and it cuts back on dark spots showing through if a chip occurs. The worst part is wiping them down. Some things eat the finish. Warm water is the best.
We also painted hideous “wood-like” dark paneling my grandfather put up in the very used living room as a “for now” solution when my parents bought the house in 1965. (Apparently the walls were a mess)Paneling is still up. LOL First time we painted a cream color. Again any chips looked hideous as the dark paneling peaked through. This time we did a pretty “prairie green” and since it has the lighter under color, chips aren’t so obvious.
Great tips Beth. This is all way too advanced for me though. I plan to hire someone to paint ours a light cream next month. I know it will be expensive but I’ll shop around for the best price I can find. I can’t wait to see yours!
Warmly, ~Melissa
PS We found out last week we are not moving so I’m on a lightening, brightening, decorating frenzy on our entire home. I’m with your hubby on the mess factor. Ugh. I’m going crazy looking at the chaos around me.
No way! I seriously JUST finished rinsing out my brushes and sat down for a brake from finishing my cabinets! Very timely post. =)) I used the water based Zinsser primer plus Berr paint and primer in one paint…I have no idea how they will hold up, but I’m hoping the double dose of primer will work to my advantage! I used that exact roller and it is awesome! I sure wish I had a sprayer though, drips and streaks drive me bonkers! Good luck convincing your hubby! =)