Last week, I shared with you 36 Creative Door Decor Ideas {Not a Wreath}. After putting together that post, I was inspired to come up with my own original not-a-wreath door decor idea! I absolutely love how this project turned out. And I thought it was an original idea, but just a moment ago as I was trying to figure out what to entitle this post I saw from Google images that other creatives have beat me to it. Womp womp. Ah well, great minds think alike in the DIY/craft/home niche and it happens all the time. I hope you feel inspired after today’s post to make your own 3D wood letter monogram “wreath”! This tutorial can be adapted to any straight-line letter in the alphabet. (If you have a curved letter that you wanted to try, then you would need to steam bend the wood which is tricky and beyond the scope of this tutorial.) Let’s get crafting! 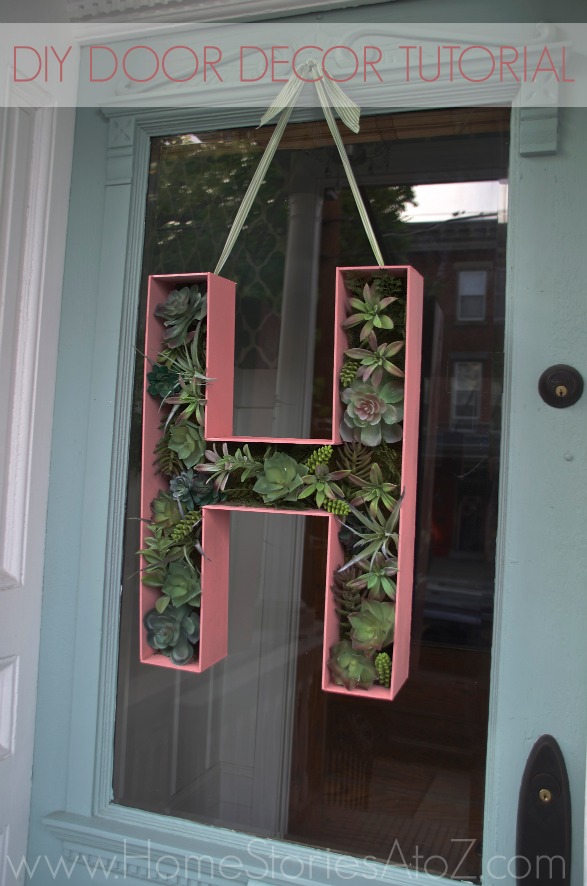
What You Will Need:
- 1/2″ or 3/4″ 2×2 piece of plywood
- 4 sheets of Balsa Wood 36”x1/4”x4”
- Wood glue and hot glue
- Tape measure and T-square
- Tools:
- Drill
- Band saw, table saw, or jig saw
- Valspar 12-oz Thistle Field Satin Spray Paint and respirator
- D-ring picture hangers
- (Optional) moss, faux flowers or succulents for filler
Step 1: Measure and draw your monogram.
I chose to make my “H” 16 inches wide. It just looked about right to me. I then made the width 4″ all around. Just use a T-square or ruler to draw your letter onto the wood. 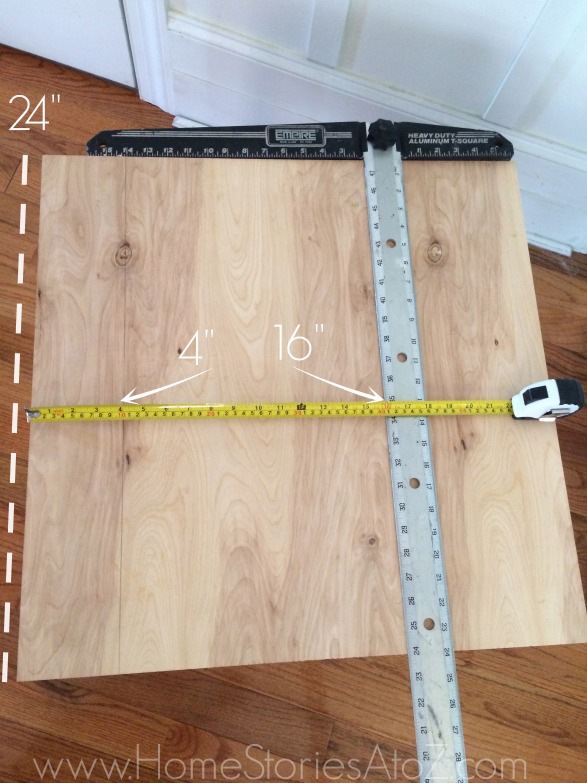
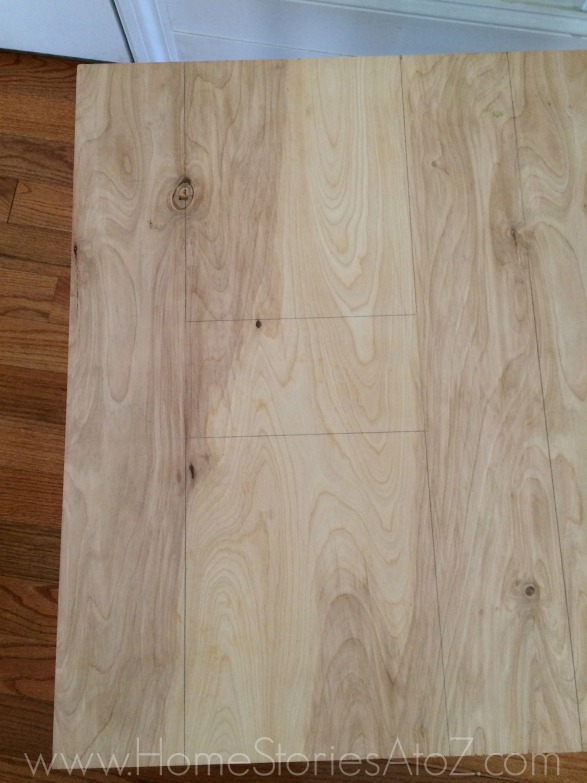
Step 2: Cut your wood using your choice of saw.
I used my table saw and a mini-circular saw to cut out the “H”. In order to ensure that I ran my wood in a straight line, I measured and clamped a piece of wood to my table. This worked as a perfect guide for the wood. Once your letter is cut out, sand any imperfect edges. 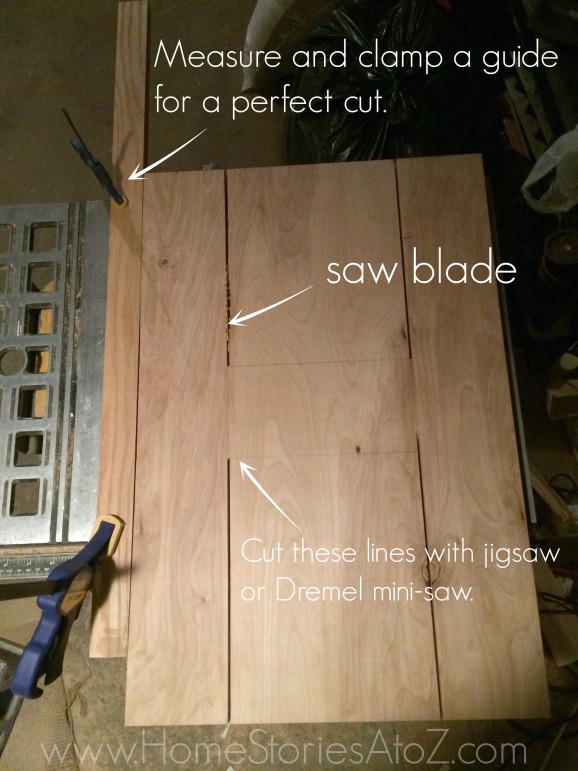
Step 3: Cut balsa wood and glue into place.
Take your sheets of balsa (found at a craft store) and cut to size. Glue the sheets in place using wood glue and hot glue. I did not have corner clamps to hold the wood together so used a bit of hot glue to ensure that my wood stayed together while it dried. 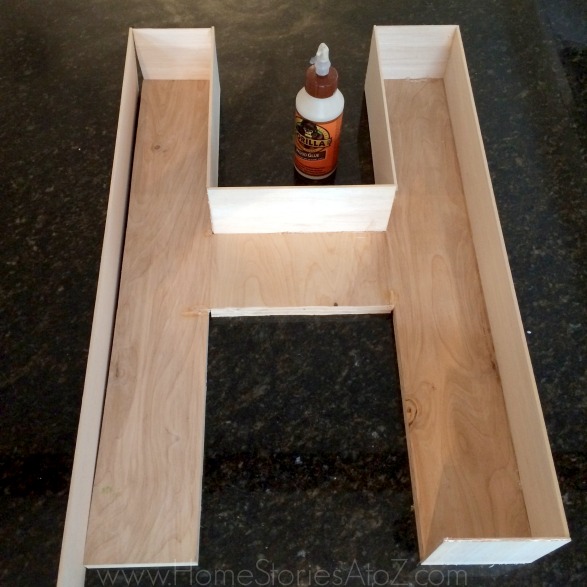
Step 4: Spray paint letter.
I used painter’s pyramids underneath my letter to keep it off of the ground while painting. You could use whatever pieces of wood, tin cans, etc. that you have on hand. Put on your respirator (ALWAYS!) and spray your letter with light coats. I used Valspar 12-oz Thistle Field Satin Spray Paint which is a primer and paint in one. It’s nice to be able to skip the priming step! 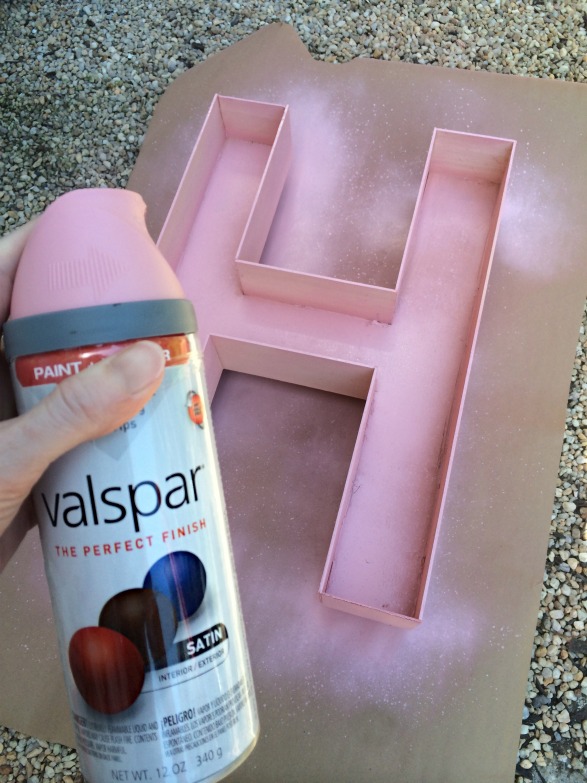
Step 5: Attach D-rings to back.
You could stop right here if you’d like! The letter looks cute on it’s own. 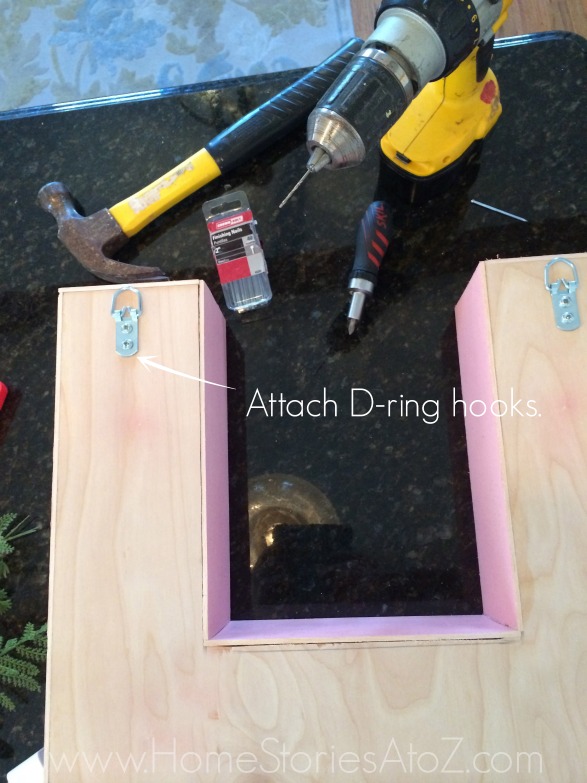
Step 6: Line with moss.
This is optional, but I think it gives a more finished product. I had moss on hand in my craft supply stash and just hot-glued it to the inside of my letter. 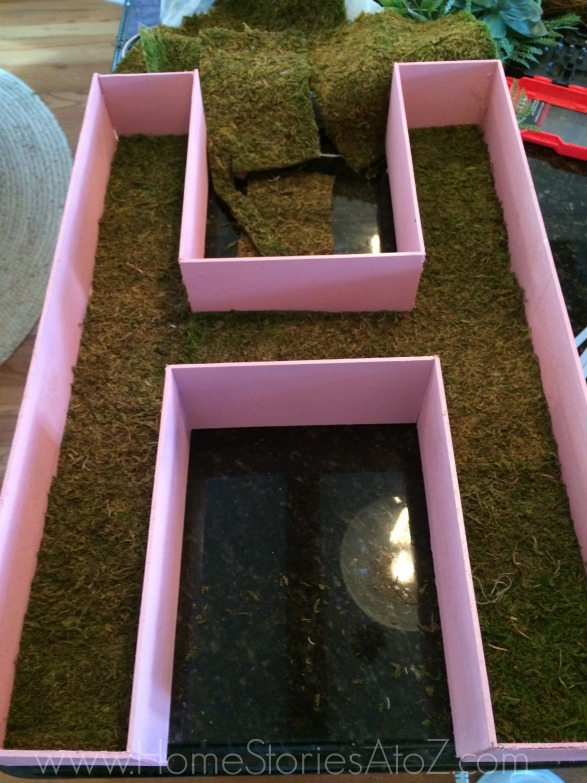
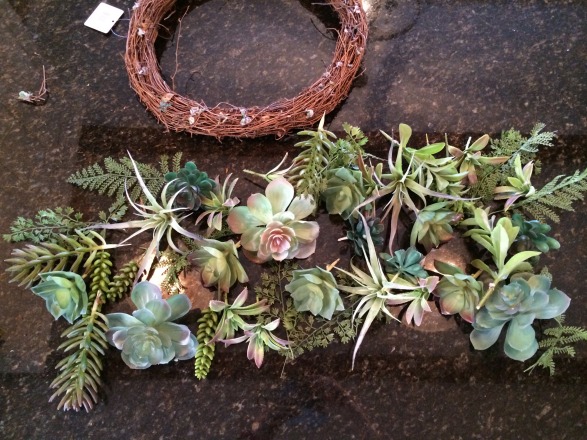
Step 7: Prepare your filler.
Faux succulents are expensive! I purchased a wreath at Joann’s at 50% for $25 and tore it apart. It was more money than I wanted to spend but I had my heart set on succulents and it was the cheapest route I could find for the amount needed. 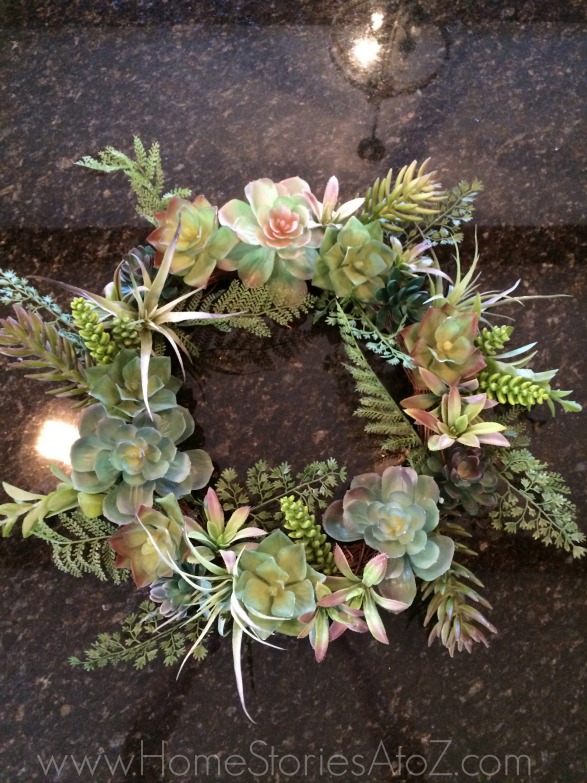
 Now step back and admire the adorableness you just whipped up! To hang my letter, I tied a ribbon onto the D-ring hooks and hung it from a nail in my door. I am in love with how springy and beautiful it looks.
 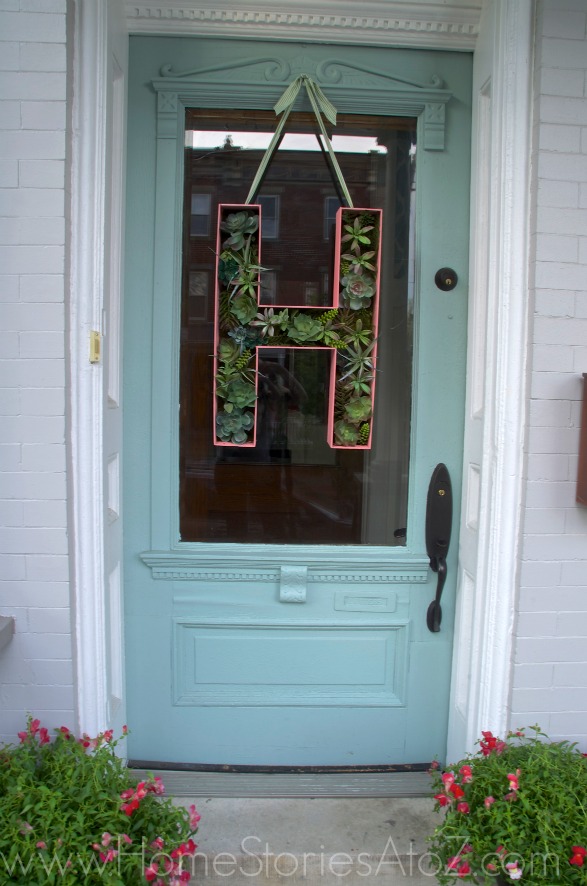 It looks so pretty with my snap dragon planters and is such a warm welcome when I come home.
  Here is a close-up of all those gorgeous faux succulents. I am thrilled that I don’t have to water them :).
 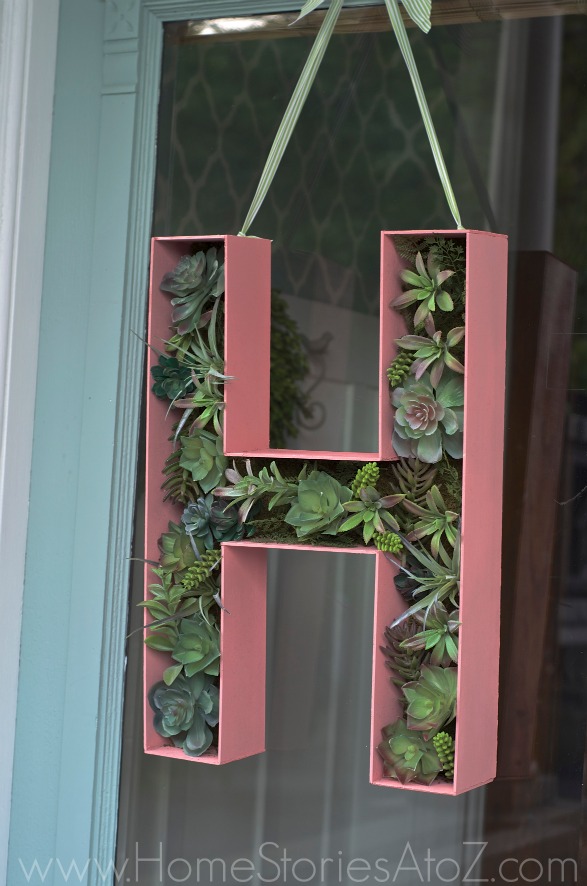 Isn’t is cute? Thanks for stopping by and checking it out. And thanks to Lowes for challenging me to come up with an original door decor idea!
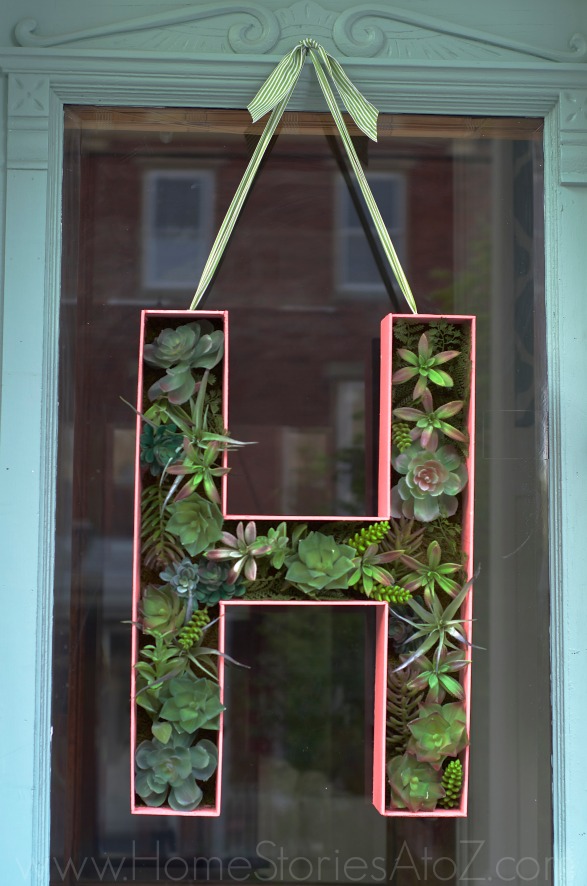
More DIY ideas at Lowe’s Creative Ideas, follow Lowe’s on Instagram, Pinterest and sign up for the Creative Ideas magazine and app!
![]()
Disclosure: As a member of the Lowe’s Creative Ideas Creators and Influencers network, I received a Lowe’s gift card to complete this challenge. As always, all ideas and opinions are my own.


I love this! I am wanting a saw to make projects like this. I currently have a simple jigsaw and a circular saw. What type of (table)saw would you recommend for a newby woodworker for projects like this one?
Gonna make one got lots of hummingbirds here im located in homosassa Florida have lots of hummingbird flowers and feeders throughout the front and back yard see lots of hummingbirds i think they need a hummingbird bath
Easy if you initial you are doing doesn’t have any rounded corners. But mine is a letter B. A much harder (unless I found a way to bend the wood) to do.
really like this idea want to make one for myself and for each of my kids any advice for a “C” a “B” a “R” and a “S” thanks alot
Hi Patty! Unfortunately all of your letters would require wood bending which is much trickier to pull off. You can google the technique, but it involves wetting the balsam wood and gently bending it into the shape you want using special clamps.
really like this idea want to make one for myself and for each of my kids any advice for a “C” a “B” a “R” and a “S” thanks alot
DEFINITELY doing this soon! LOVE IT! 🙂 That “H” would go great in our business office too!! 😉 Thanks for posting!
DEFINITELY doing this soon! LOVE IT! 🙂 That “H” would go great in our business office too!! 😉
i did the same thing from a better homes and garden book except mine is a K and i dont have it on my door i have it o the wall outside 🙂
I really love it Beth, Awesome!!
Thank you!
This is great, Beth! Love it!!!
Thanks so much Sara!
Beth I adore that! Well done. At first I thought they were real. Good call on the faux. They look so legit!
Thanks! My original plan was to use a mesh screen and plant real ones. However, I did something similar to this with a house planter that I built and it took weeks for the succulents to grow roots so that it would stand up vertically. And although my house planter is still alive (a small miracle for me) the wood on the bottom has become unhinged and leaks soil and makes a mess. Faux is so much easier!
That’s super cute, Beth! And very original. Love it!
Thanks so much Kerri! 🙂