If you are just joining our How to Decorate {for the DIY’er} Series, welcome! Miss a post? You can find all the entries for our series listed conveniently on one page here.

Welcome back class! Today we’re going to hear from one of the most talented people I know. I have talked about my friend Kathleen on my blog here, here, here, here, here and here….at least! Yes, it’s safe to say that I am a huge Grosgrain fan. (My goodness! Do I have a collection of some of the most amazing women friends, or what? Ridiculous!) Kathleen is amazing. She is not a home blogger but could be if she chose to. She is a clothing designer, seamstress, artist, photographer, and DIY master.

In addition to her blog Grosgrain, Kathleen blogs at The Tum Tum Tree where she shares some design inspiration. Impress us with your mad skills Kathleen!
…………………………………………..
I’m so excited to be here at A to Z today! I feel a little out of my element since I write mostly about sewing and crafts, but to be honest I’ve always had a passion for interior design as well so it’s nice to revisit that part of my life on A to Z! Beth is of course a fabulous designer, source of inspiration, and not to mention close friend. Her house is so amazing and I’m constantly envious of all the little (and BIG) things she has done to it.
You see, I live in a cute little house from the 1920s, but unfortunately we rent which means I can’t tear out the ugly Berber carpet, I can’t cover the ugly vinyl kitchen flooring, I can’t add classic board and batten to the walls, I can’t install recessed lighting, and I can’t go crazy with the paint. For someone who thrived on that sort of thing a few years ago, it was tough at first.
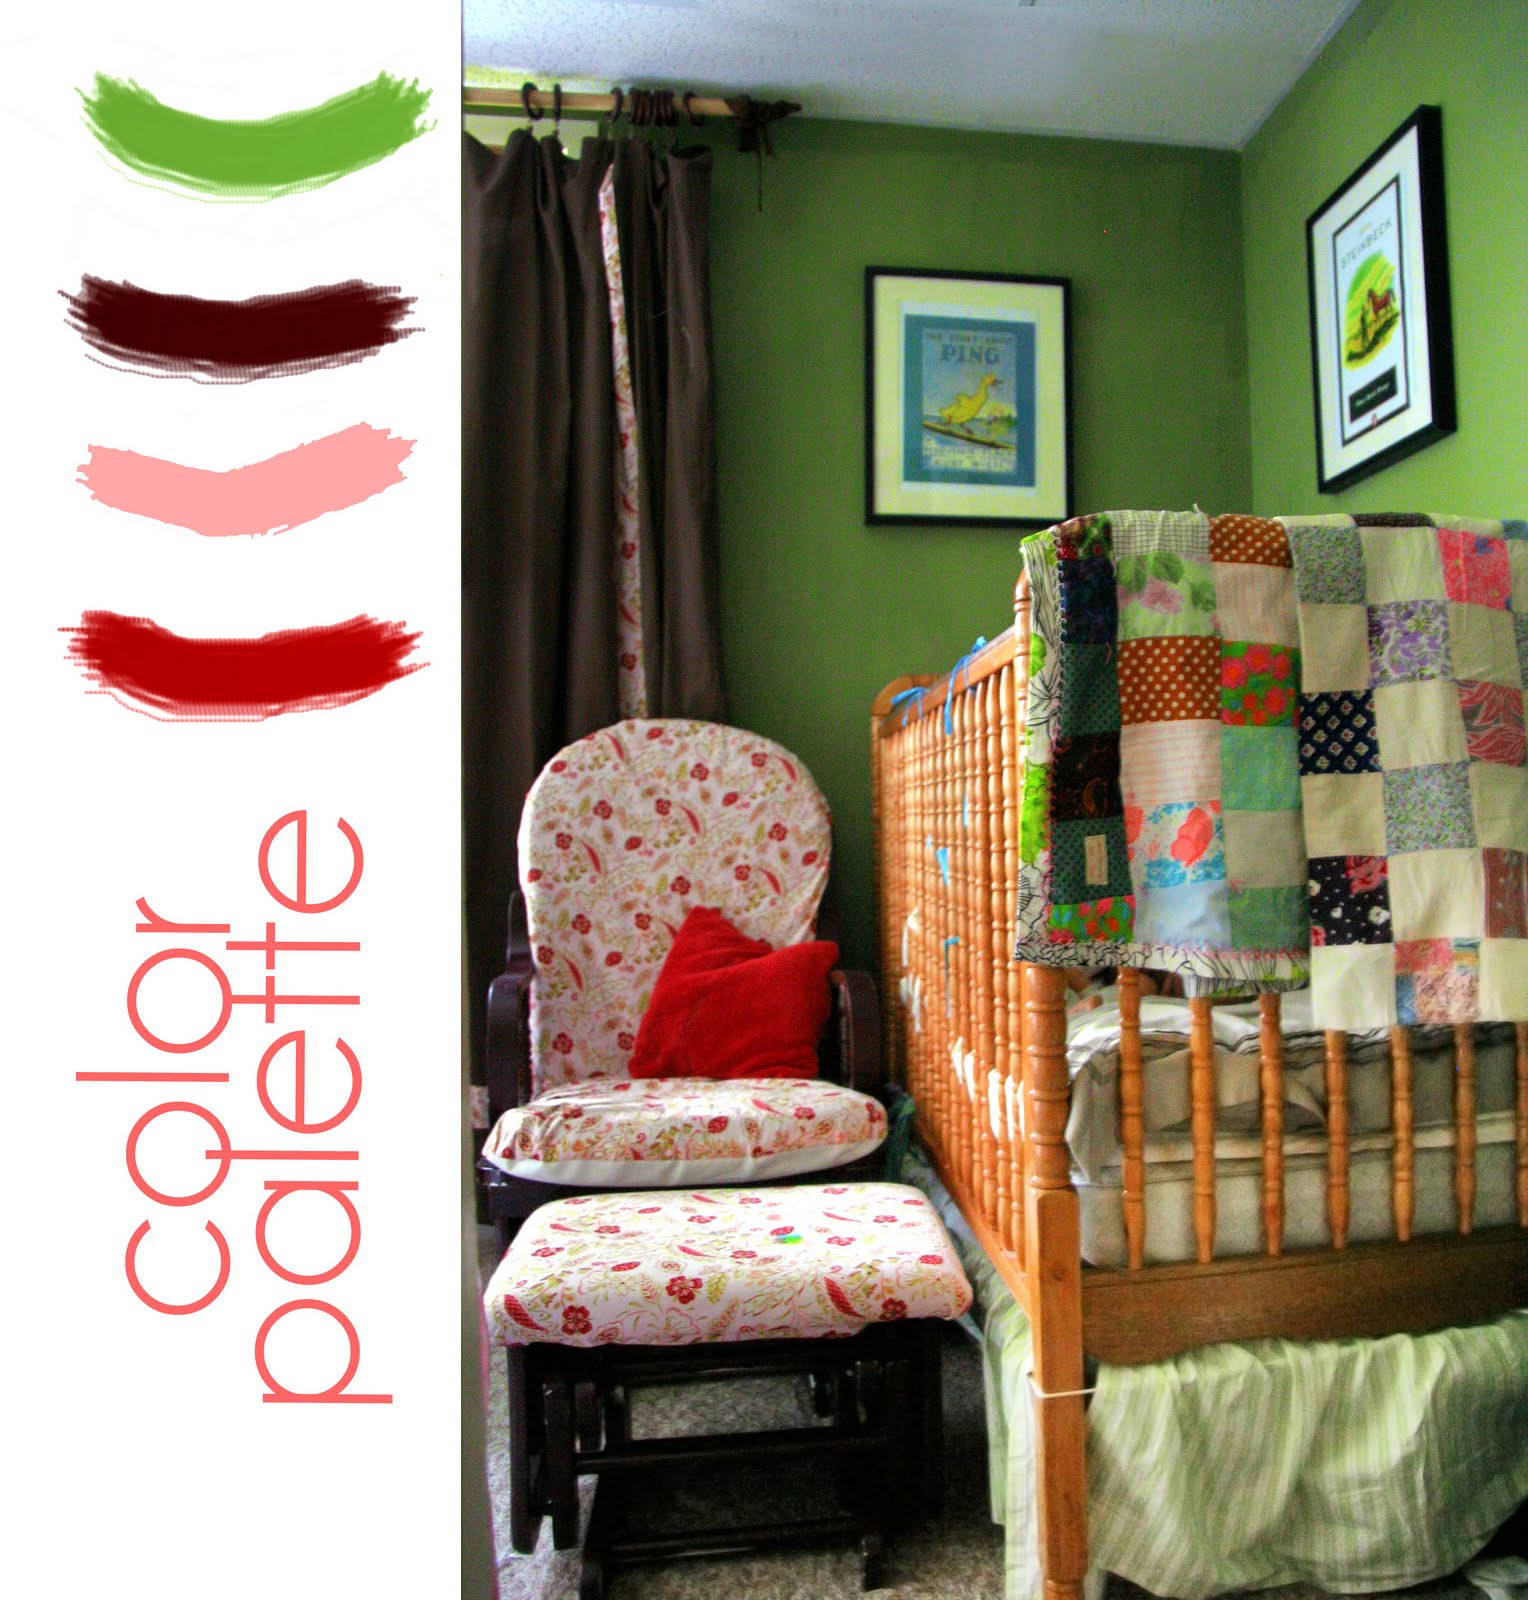
So I’ve learned how to decorate without my circular saw and instead playing with color and decor, avoiding changing as much of the structure as possible (i.e. temporary decorating). I have made some consolations. I painted the sun-room-turned-nursery (below) and now the upstairs bedroom. But it has been challenging working around some of the less attractive aspects of the house and emphasizing the good–like the wide thick moulding and trim, the large multi-framed arts and crafts windows, and the thick moulded solid wood doors.
These tips are also good for if you don’t have the funds to change big things about your home too. So technically it could be thought of as budget decorating too.
Knowing when to spend and when to save:
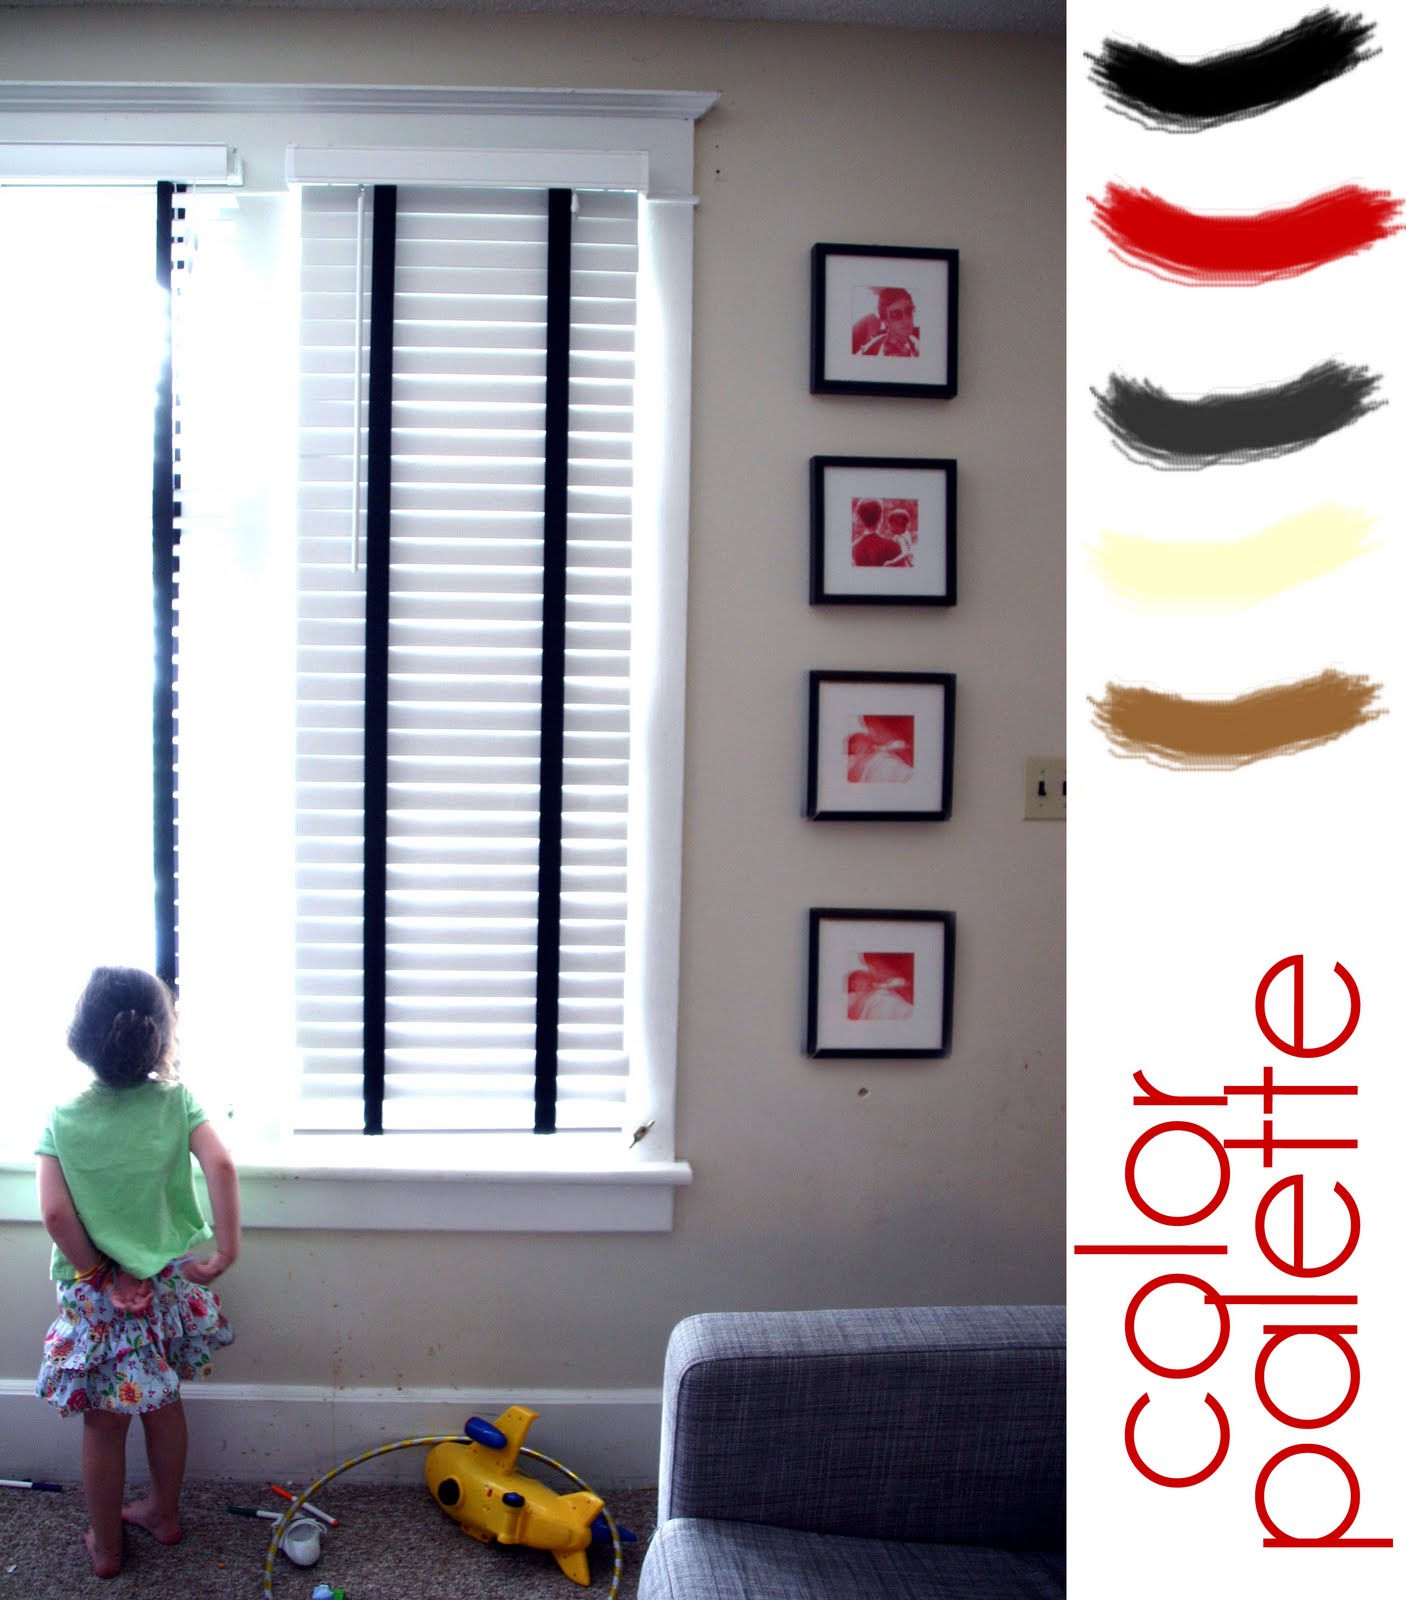
If you can use it in another space, splurge. If you can’t use it again, save. If the satisfaction you’ll get out of improving your space and making it more personal outweighs the the money you’ll lose in the long run, then splurge. Sometimes it’s a balance. For instance, when we first moved into our house I made my own curtains for the front windows. They looked alright when open but looked messy when drawn. In addition, they were difficult to pull shut. If it were my own home I’d splurge on custom plantation shutters. But since those can be hundreds of dollars, I compromised and eventually bought plantation blinds that were on clearance at Home Depot for only $20 and added my own woven trim to them for a comparable classic and clean look. I also loved that you could see the wide white washed moulding that was once hidden by the curtains.
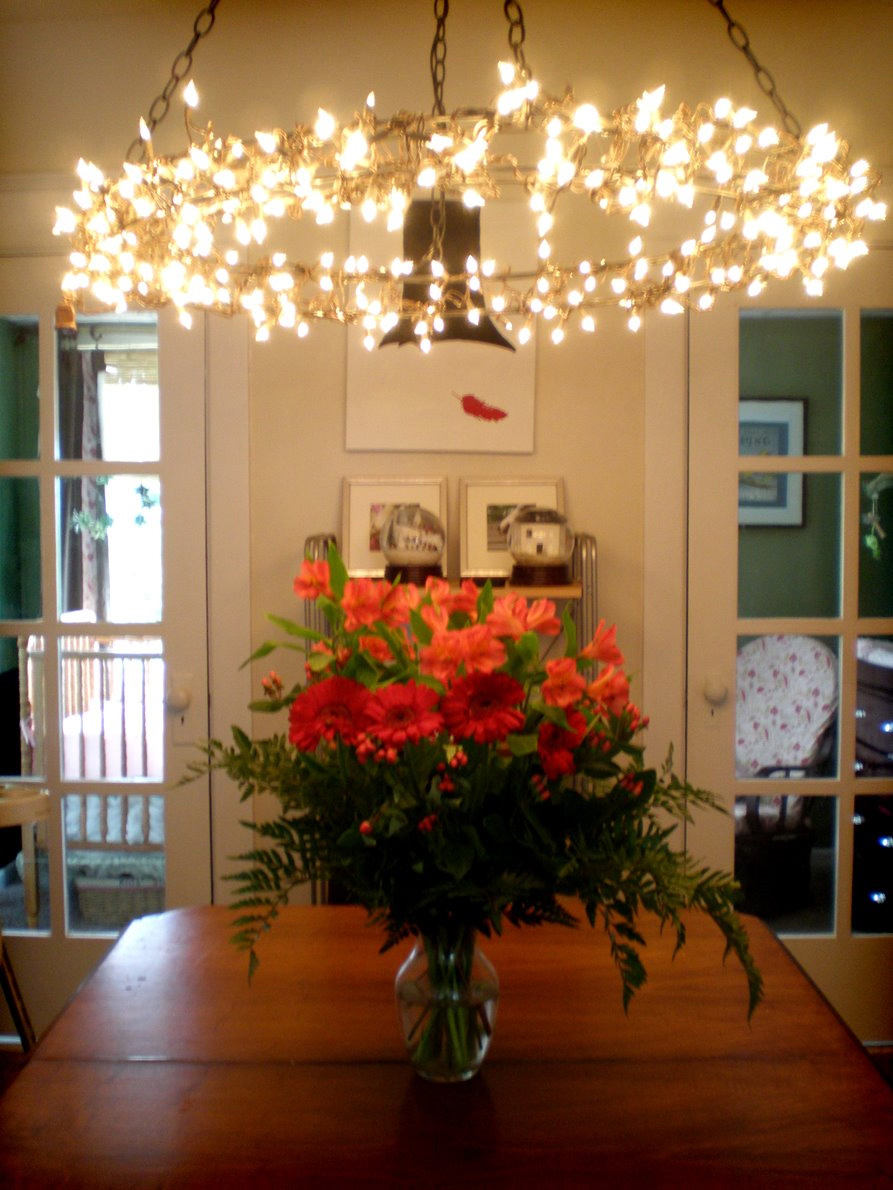
Another place to splurge is on light fixtures. As long as you keep the original ones to reinstall later you can take yours with you when you leave. Our dining room had this fixture that was decent in appearance but gave off a really depressing bright light. So instead I made the fixture below using two 3′ wreath frames, wire, black wired Christmas lights, a stripped extension cord and chains. You don’t have to make your own, but it’s always nice to be creative. I replaced the fixtures in the upstairs bedroom with track lighting and a dimmer switch for a more ‘recessed’ lighting look.
More on windows:
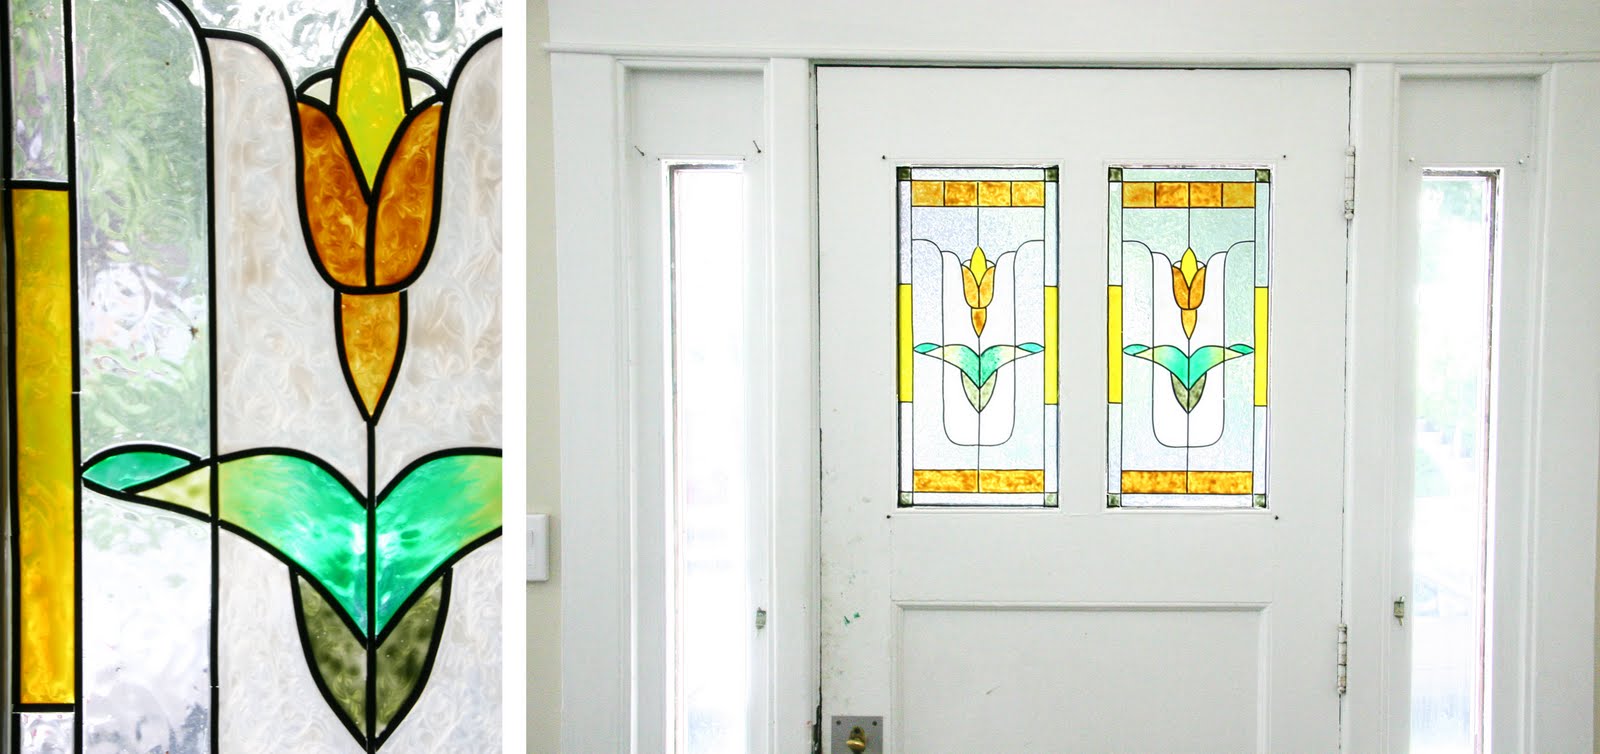
As with the giant living room windows, I resisted buying expensive custom window coverings for the front door since I didn’t know if we’d be moving in the near future I didn’t want to waste my money buying something we’d never use again. At the same time, they needed to be covered at night. It was creepy not being able to see out in the darkness but knowing anyone could be seeing in to our lighted living room. But I didn’t like the look of curtains over the front door.
If I were my house I’d invest in stained glass windows. Since I’m not going to do that, I found glass paint which dries the way stained glass does, with a warpy yet translucent look. I created my own design, painted it onto a sheet of Plexiglas I cut myself and voila! Cool looking window covers for not a lot of $$$$. If you can find a way to get the look for less, then it’s worth spending a little money. In all, the paint and the Plexiglas cost about $20 which to me was worth not seeing ugly curtains over my front door.
Color:
When you’re designing a temporary space, color is going to be your main weapon against your limited options. Unless you want to change the color of your walls, you’ll have to work with what you have. So if you have a neutral living room you’ll want neutral colors with a splash of color somewhere (see pic at bottom of post).
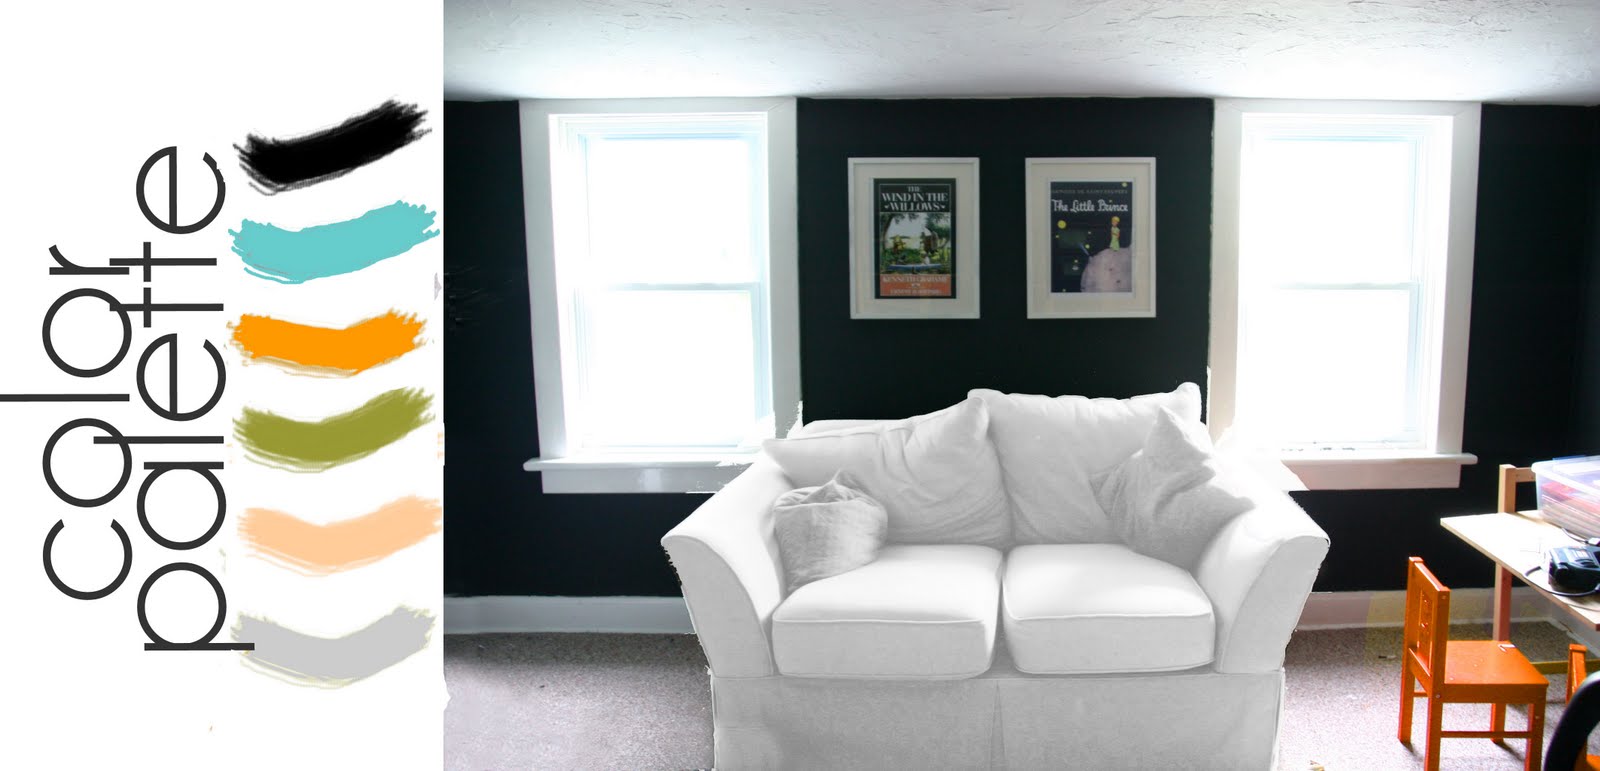
If you do decide to paint the walls, you have a lot more to work with. In the pic above, I’m in the middle of designing my old craft room into an upstairs room for my two daughters. I’m not finished, but as you can see I went with black for the walls. (I know, everyone thinks I’m crazy) but I’m pairing it with a lot of white and a few other great colors to give it a sort of Orla Keily feel. When I design a room, I like to pick a main color and then add three or four more secondary colors. To me, the more colors that are tied into the theme of the room, the more lived in the house seems. Less spartan. When all the colors work together it gives the room life, a sense of home. But just be sure that they aren’t clashing. It’s a fine line at times but there is always a great in between.
Personalize:
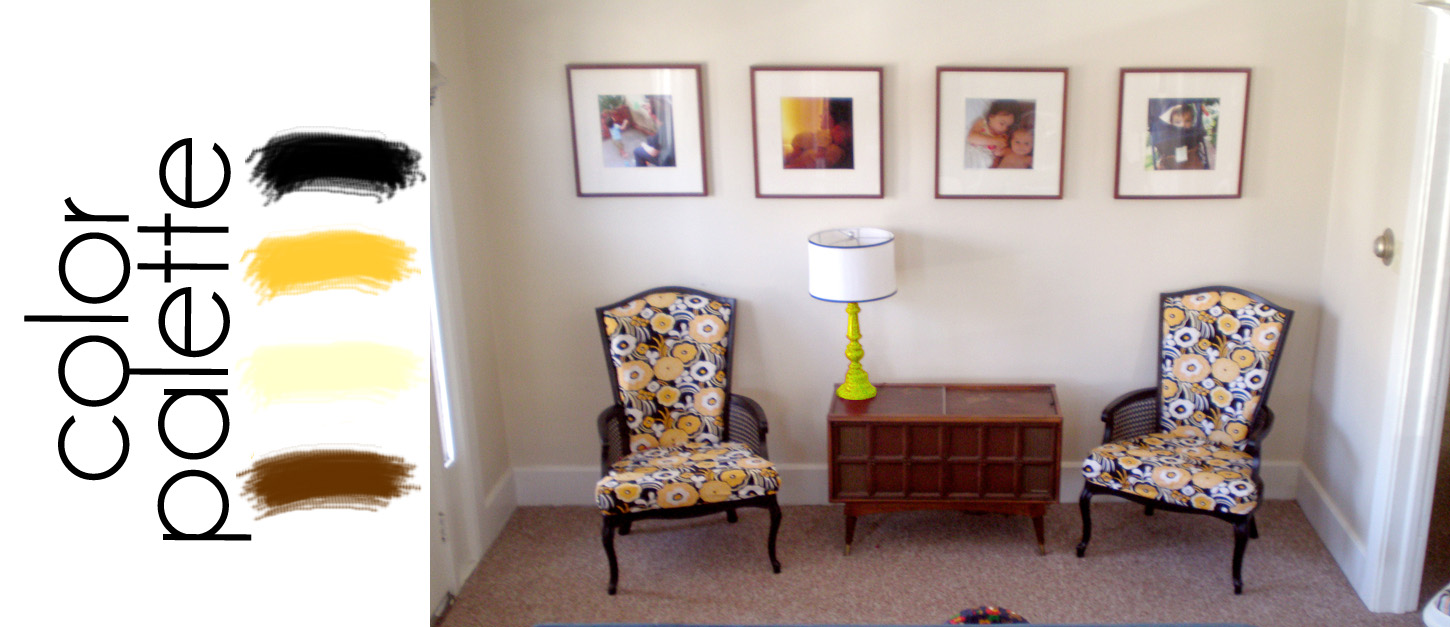
Another great solution to distract from bland ivory walls is to add interesting points of focus. The first thing people see when they come into my house are the photos of my family. I bought large 20×20 frames and filled them with 11×11 closeups of the family that I had printed at Staples for around $5 a pic. Now, you may wonder, what about the nail holes? I found the exact paint color that was used and plan on puttying the holes and repainting over them when we move. Maybe that’s a little much for some people, but for me it was a matter of outweighing the satisfaction of appearance to the future effort of restoring the original walls.
Ultimately, I’ll admit I’d rather be living in our own home but I like to pride myself on the fact that I’ve worked with what I have and have done a decent job at it. I’ll admit, I still could do so many things to make the house more appealing but it’s about knowing how much effort you want to put into something that you’re ultimately going to have to abandon. I think the effort I’ve put in and the choices I’ve made are a great compromise. Hopefully, you renters out there who love to interior design can find that middle ground too! Good luck;)
……………………………………
Fantastic tips Kathleen! Okay class, let’s review. If you rent it’s important to know when to spend and when to save (light fixtures are good places to splurge), play up those windows with inexpensive treatment options, add pops of color to play up builder’s beige, and most importantly personalize your nest and make that baby your own! How about you? If you rent, have you implemented these tips in your space. Any to add? Talk to us!
Related Posts


I also LOVE the home made chandelier!! Yes please post detailed instructions?? Please?! Love it!!!
ooops wrong address above. Please reply to this comment. Would you mind sharing more details on your lighting fixture. Where did you find your lights and wreath hooks?
Would you mind sharing more on your lighting fixture? Where did you find your lights and wreath hooks?
Just love the lighting idea. So, I’m an idiot when it comes to things light this, is there anyway to get detailed instructions from on how you did this? Also, how did you hook it up electrically? I’m getting ready to move into a very 1970″s rental, that we are not allowed to do much to. Need a lot of help. You should see the kitchen. Whoa!!!!
we are an active duty military family on military base housing (similar to a rental home) and need creative and unique suggestions to decorate my plain, brown, front door…several houses have wreaths, but want something different…we live in hawaii…any suggestions would be greatly appreciated
Nancy, we’re military too, jealous your in Hawaii.
I love the idea of a feux stained glass. We just moved into a rental with a solid glass front door (who does that!?!??!) It looks ridiculous with the curtain I’ve put behind it, but now I’m going to give this idea a go!
I loved the faux stained glass. How do you hold the plexiglass in place?
I love the idea of doing the faux stained glass treatment on plexiglass instead of directly on the window. It’s so simple yet opens up all kinds of design possibilities. Thanks so much for the wonderful tip!
I don’t know if you realized this, but straight pins can be used to hang things on the wall. Buy the ones that look a little more sturdy, and they can hold quite a few pounds! I read this years ago, and just about everything on our walls are up on a straight pin!( For the last 17yrs/some have been changed out:) …And then the hole is much smaller to fill and cover up, and often not noticable at all.try it!
Due to a job change, we are now looking at having to relocate every year or two for the next five years. These tips will be a big help as we try to make each place feel like our home. I especially appreciate all the suggestions for dealing with window blinds.
Loving this feature. Great site!
And, as an aside- I’m a new but avid reader of your blog and have just started blogging myself. All the great blogs I’ve been following (yours included of course) are so inspiring! Please check out my site and follow if interested.
Thanks!
Love this. My biggest problem with our rental is the cheap mini blinds all over the place. I’m stuck with them because I don’t want to pay to replace them with plantation blinds that we might not be able to use at a new place. We have 16 windows with these blinds in them. I love all the suggestions, especially about adding color when you can’t paint the walls. Thank you for all the tips!
Jaimie,
I know what you mean about not knowing if you will be able to use them again. It’s definitely a concern when you’re a renter. And for me, it really hinged on the facts that I knew we’d be at our current house for at least a couple more years AND I found some really cheap plantation blinds at Home Depot over 55″ for only $20 on clearance.
But I’ve also seen them at IKEA (man, someone should be paying me for recommending them so much) for really cheap too. They are listed as ‘venetian’ but they are made of wood and are about the width of my ‘plantation’ blinds. The key is adding your own twill tape. That gives it the POP that looks more expensive.
But 16 windows are a lot even for cheap blinds. What I’ve done in the past is this. Bought cheap $1 per yard fabric, cut them, sewn the edges (if you don’t sew you can also try hot glue, even no fray spray for the edges. Then to save on rods I cut down a bunch of bamboo shoots from someone I found on freecycle who had bamboo growing in her yard. I bought the rod holders but you can always reuse these no matter where you move. I’ve made window treatments for my entire house on about $30. It’s a lot more work, I won’t lie, but if you have the time and patience why not?
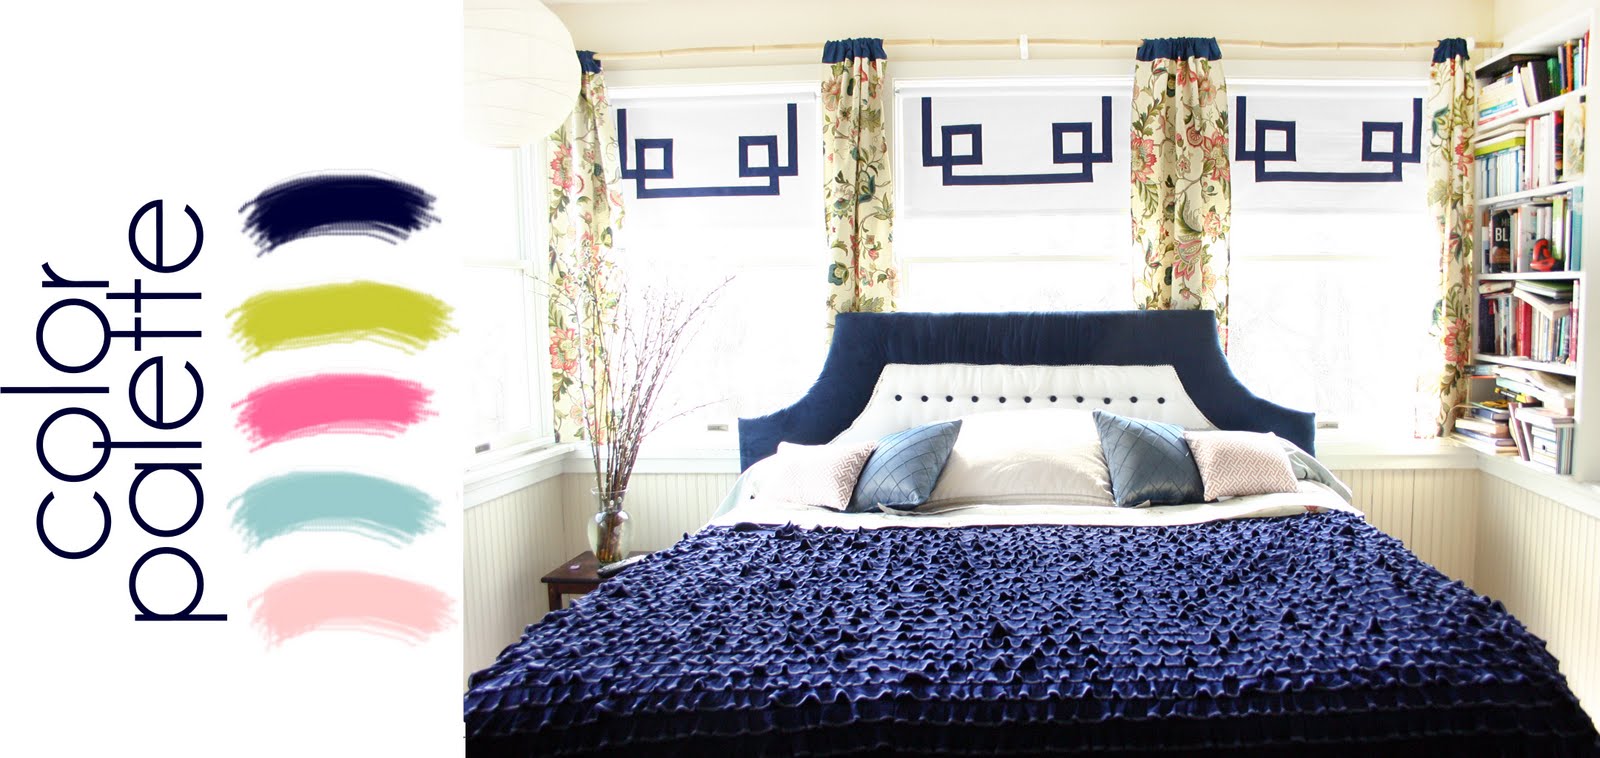
Oh one more thing! I just made blinds for my bedroom (pictured in this post) for REALLY cheap. I paid only $5 per blind and then hotglued twill tape in a geometrical pattern around the perimeter. I bought all the twill tape in one big roll at a fabric outlet store for only $7. All together the whole project cost $32 for five windows. If you want the tutorial it’s on my blog:
http://grosgrainfabulous.blogspot.com/2011/03/bedroom-makeover-week-day-1-mitered.html
We have rented forever, but are currently in escrow with our first house. I have one little tip for everyone who wants to hang things on their walls. I used to work in an art gallery and often delivered and hung expensive and heavy paintings in multi-million dollar homes. Invest in picture wire, d-rings, and those little picture hooks (ook makes a good one). You can buy them at any hardware store or target and bed bath & beyond sell them too. If your item doesn’t already have picture wire, screw d-rings about 1/4 the length of your picture into the back of the frame and twist picture wire (thin wire is fine for light items, but use sturdier wire for heavier items) between it. Make sure it is not too tight or too loose. You want the wire to hit the middle of the frame when stretched taut. (You don’t want to see the wire when you hang your picture. The hooks look tiny, but since the tiny nail goes in at an angle and braces against the wall, they are very sturdy. You simply choose the picture hook based on the weight of your painting. The bonus is that it is super easy to hang anything. One hook (provided it is the right weight) placed in the center of where you want to hang is all you need. You also do not have to be super accurate..the picture wire is very forgiving. When you need to take the hook out, your hole is teensy, tiny. Plus you will never have to worry about your painting or mirror falling, because those babies are sturdy….you don’t even need to put them into a stud. If you are hanging a very heavy thing, like a mirror with an iron frame, you should use two 3-nail hooks placed fairly close together…no more than 2-3″ apart. Easy Peesy. To remove, simply gently tap the bottom of the hook up with a hammer (in the direction of the nail). No prying. You won’t even stretch the wall. Hope this helps someone.
Fabulous tip Heather! I think you just helped a bunch of us out. Thank you!
Heather,
Thanks for the tip! If you buy your frames at IKEA the bigger ones usually come with the wire and nifty hooks included. That’s where I get a lot of my frames. The RIBBA ones always look so clean and modern. As you can see from my pics, I’m a big fan of the RIBBA;)
I love the black walls!! And the stained glass window insert, I never ever would have thought to try that myself.
Tips were fab, (even for us non-renters!) and thanks again Beth for hosting this great event, I have learned so much already.
Nicole,
Thanks! It’s nice to hear that (about the black paint) from people because I’m certainly not feeling it from the family. But what do they know? huh? ;););););)
When my first daughter was born I painted her room red everyone FREAKED! But I also installed white board and batten on the walls and had sweet homemade rosebud sheets and it in the end it looked very girly and I got many compliments and everytime I walked in the room it felt perfect. I was so glad I didn’t listen to what everyone around me was saying. So often people can’t see that end goal.
very nice faux stained glass and I like the black walls!
Thank you! I like it too;)
We are a military family so we have had to do our fair share of renting! Grosgrains tips were great! I always chat with our potential landlord because I’m not willing to rent from someone who isn’t going to give me a little bit of wiggle room when it comes to decorating. I have noticed a lot of rentals have flat paint which makes it easy to touch up, but I also usually request that the paint be freshened up and the cans be left because I can guarantee you I will make a ton of holes in the wall. I would be so unhappy in a house with empty walls that doesn’t feel like home. I also use a lot of vinyl expressions from Uppercase Living, love them, they have so many to choose from and they add so much interest to the walls but can be removed without damaging the wall or leaving holes to fill. I also have a lot of flower arrangements/greenery, each house we’ve lived in has different ledges or built-ins, or this one now has really narrow space above the kitchen cabinets, so I can move all my arrangements around to fill those spaces in each house. Another, thing I try to keep in mind is furniture size. We don’t own any massive over sized couches or armoires that won’t fit in some rooms. We have loveseat size sofas and a couple accent chairs that can be arranged based on the size of the family room or relocated to the master or study if they don’t fit. Our desk in the study is massive but it’s reconfigurable so we have been able to change it around to fit the space. Lastly, I buy cheap curtain rods, if I make curtains for the room I know that later I can cut them apart and make balances or cornice boards if they don’t fit in the next house. But beautiful rods are expensive and might not fit our next set of windows. So I like to do a rod pocket on the drapes to hide the cheap drapes or use medallions to hang the curtains because those can be reconfigured later.
Christi,
Thanks! Those are really great tips too! I wanted to mention flower arrangement and forgot. You’re right, they really do make a space homey. As for the large furniture, I buy a lot of IKEA stuff. I know it’s not fantastic quality but it’s great for renters because it can be taken apart even the sofas. Thanks for all your thoughts!
This is perfect timing! I’m moving in the next couple of weeks into a new rental. Fortunately, I was told that the paint needs to be freshened up, and I could choose the colours! Hopefully this means they’ll leave the leftover cans behind so I can putty/re-paint when I leave… I WILL be putting up artwork and the like! I didn’t think of updating light fixtures, but I like it.
Oh that’s always nice. Our landlord said he’d repaint the top floor and then never did which is why I didn’t feel so bad about painting over it.
The light fixtures are pretty easy. Just know about what to do with the ground wire or you can start a fire. My dad is an electrician so I have him help me with a particularly difficult wiring but usually I can do it myself.