
Learn how to build this Pottery Barn Kids Inspired Letter A bookshelf by following my step-by-step tutorial!
How to Build a Letter A Bookshelf: The Backstory
A few months ago, while I was still in the planning stages for my boys’ bedroom), I put out a plea on Facebook asking my blogging besties for help. Basically, I knew that I wanted to create a giant letter A and Z for above my boys’ beds, but I just wasn’t sure what material to use to make the letters. Fun fact: The “A” and “Z” in my blog name are in honor of my boys, Asher and Zephan.

Ten different, amazingly creative women chimed in with equally awesome and different ideas. Ack! How was I to choose? Well, when Ana White whipped up some plans for these functional Pottery Barn Kids inspired bookshelves, I was sold! Nervous as to whether or not I could pull them off, mind you, but sold nevertheless. Although I’m not a stranger to power tools, my carpentry skills aren’t great. All of the math and spatial relationship business hurts my head. With a bit of help from my husband Matt, I created this fantastic focal point in the boys’ bedroom! Today I’m sharing with you a step-by-step tutorial on how to create your very own Pottery Barn Kids Inspired Letter A bookshelf!

Safety First: Protect yourself by investing in the proper safety equipment before building the Letter A bookshelf!
This project requires a lot of power tools and spray paint, and therefore a lot of safety equipment! If you are going to DIY, be smart and invest in some protection. For this project, I used:
I didn’t use the chemical gloves pictured below but paint gloves are a fantastic idea. We all know how difficult it is to get spray paint off of hands!

Video Showing Tips on How to Build Letter A Shelf
To save some time, push play below for a short four-minute video demonstrating some helpful hints, building tips, and safety tricks. The video will help you cut some corners and explain quickly how I created the bookshelf.
Letter A Bookshelf Plans

Materials Needed and Cut List:
| Shopping List | Cut List |
| 2 – 1×5 @ 8 feet long1/8” Pressboard
1 1/4″ Wood Screws 2” (could get away with smaller) finish nails Hanging Bracket/Hardware that attaches to back (use long finish nails to secure hardware) Toggle bolts if hanging in drywall.
|
1 – 1×5 @ 9.6” (long point to long point, both ends cut at 15 degrees off square, ends NOT parallel)2 – 1×5 @ 5.4” (long point to short point, both ends cut at 15 degrees off square, ends ARE parallel)
2 – 1×5 @ 7.2” (long point to short point, both ends cut at 15 degrees off square, ends ARE parallel) 2 – 1×5 @ 36” (long point to short point, both ends cut at 15 degrees off square, ends ARE parallel) 1 – 1×5 @ 8.7” (long point to long point, both ends cut at 15 degrees off square, ends NOT parallel) 1 – 1×5 @ 12.75” (long point to long point, both ends cut at 15 degrees off square, ends NOT parallel) 1 – 1×5 @ 20.1” (long point to long point, both ends cut at 15 degrees off square, ends NOT parallel) 2 – 1×5 @ 6.3” (long point to short point, both ends cut at 15 degrees off square, ends ARE parallel) 1 – 1×5 @ 9.15” (long point to long point, both ends cut at 15 degrees off square, ends NOT parallel) Trace and cut around A on pressboard. |
Step 1: Build the base of your Letter A.


Step 2: Attach the “feet” of the Letter A shelf.


Step 3: Attach the sides of your Letter A.

Step 4: Attach the top of piece to your Letter.

Step 5: Begin attaching the interior components of the bookshelf.

Step 6: Use finishing nails to build the interior components of the Letter A shelf and attach.


Step 7: Trace the Letter A bookshelf onto pressboard.


Step 8: Use a nail-gun or finishing nails to attach the backing to your Letter.


Step 9: Spray paint your Letter A bookshelf.

Step 10: Attach picture hangers and hang your Letter A bookshelf.
Hanging these bookshelves is a challenge! There were no studs in the drywall where I wanted to hang the bookshelves, so we installed two Toggler Heavy Duty 3/16″ Toggle Bolts. These bolts make rather large and conspicuous holes in your drywall so only use them with your semi-permanent wall-hangings. To the back of the bookshelf, I attached two sawtoothed picture hangers with long finishing nails (NOT the small brad nails that come included in the package). D-ring picture hangers with long screws would also work well. These shelves are heavy, so make certain that you are using the appropriate hardware to hang your project.

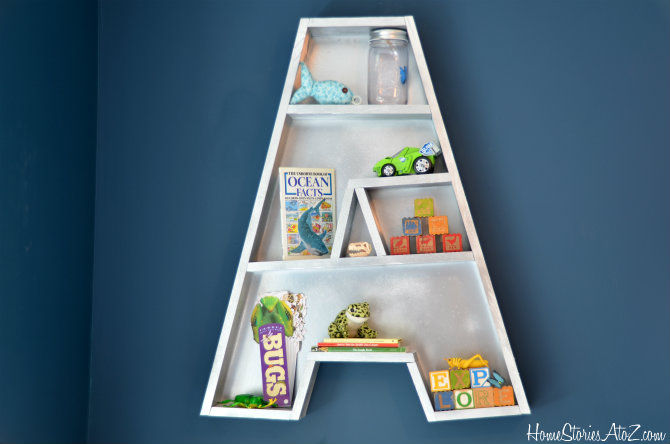
Yay! At long last, we get to enjoy all of the hard work! I am absolutely thrilled with how my bookshelf turned out and more importantly Asher LOVES his letter A shelf. We had fun decorating it together with all of his favorite treasures!


Hi! Do you know if anyone makes and sells these letter book shelves? I’m looking for the word READ. Thanks!
Sorry for the delayed response Tracey! I don’t know if anyone sells these.
Will you please add the tutorial of the letter Z?
Hi Jennifer, I did these so long ago that I do not have the plans any longer. I modified plans that Ana White made for me because I wanted the letters to be larger than she created. Ana has both the letter A and Z plans posted on her site. You can find the Z here: http://ana-white.com/2012/09/plans/letter-z-shelf Just be sure to follow both the A and Z plans on her site if you are making both so that they are the same height.
These are SO awesome! I’m going to mimic and try and make an M and an N for my boys.
What about round letters: C, D, P, S, etc? Do you have templates?
So sorry Diana! I only had A and Z. Ana White is the brains behind the shelf plans so it wouldn’t hurt to ask her to design plans. You never know!
Such a cute idea and project, done so well. Have you considered making these to sell? I want them with my kids initials (H and R) so please do let me know. Thanks!
Do you have any other plans for the rest of the alphabet? I have other initials I would like to do
I’m a professional carpenter, and a few things in your video worried me, especially since you mention safety in your video.
First, you’re using power tools with your hair down. That’s a huge problem. If your hair gets caught in a tool, it can rip out a hunk of your scalp. Use a scrunchie!
You mention using work gloves, which is fine when carrying wood, but you should never use work gloves while using saws. The glove can get caught in the tool and pull your hand right into the blade.
Also, the cut you made on the table saw is not safe. If you’re cutting a long board the short way, it can easily get pushed out of square. The board will catch between the blade and the fence and the blade will kick the board back at you. At the least, this will hurt. At worst, you can lose a finger. It’s called kickback, and it’s the most common way people are injured using table saws. You should use a miter gauge or a cross cut sled, and you shouldn’t use the fence. It’s actually safer not to use the fence when cross-cutting because then nothing can get caught. Honestly, a chop saw is a more appropriate tool to use for this, if you have one available.
Please please please include some additional safety information! I know 3M won’t pay you to do the above things, like they pay you to talk about their eye and ear protection, but your viewers need to know how to protect themselves. Imagine how you would feel if someone hurt themselves because they followed your video. I love seeing women doing their own carpentry projects, it’s so inspiring and empowering, but not if you lose a finger.
All of the above being said, the shelf is very cute and I think the wonky shelf is charming 🙂
Hi Kate, thank you so much for your comment! I knew in hindsight that my hair down was not a good idea. I’ll update my video with annotation comments to reflect your points. Thanks again!
Holy smokes that was an awesome videooooooooooooo! That’s one of the best I’ve seen o’l wise one. Good job! The A came out beautiful and looks fab in your boys room 🙂
Aw, thanks girl :).
Hey beautiful lady!!! Thanks for working with me on this project! It turned out awesome (but of course, everything you do does!) and I’m especially impressed with how you scaled it up! Hope we get to work together again!
Me too Ana! Thanks again for the plans and the inspiration to follow through with them :)!
The letters are awesome! Beautiful job. Love that blue wall color too.
Yeah what Kim above me said!
~Bliss~
Bliss » 🙂
Look at you DIY diva! The shelf turned out adorable! I’m sure he loves it! I loved the video too! Yay Beth!
Thanks sis!
These shelves are absolutely amazing! I love them! And they are perfect for your boys!
What color is the wall paint? I am looking for that perfect blue for my son-and in this picture it looks like what I would like. Thank you! By the way, the letters look great-good job!
Thank you! The wall color is Rainstorm by Sherwin Williams.
These are so awesome! Great job!
This are seriously so cute! Great job, girl!! I love how they are functional and a great piece for the room at the same time. Love them! Now all I need are some guts to create my own! Thanks for the tutorial!!
Oh gosh I love these! Perfect for a new married couple, perfect for a baby’s room, little kids-so many options! Maybe a married couple wouldn’t want chrome but pretty stained wood would be amazing 😉 I’m going to bookmark this for future reference. Great job!!
Thanks Sara! And I agree, I think you can easily customize the letter with paint or stain to fit your own style/decor. I’d love to see this in weathered wood!
Cute letter bookshelves and I’m so glad to see you protected yourself while working. So many DIYers skip that step because “it’s just going to take a second” which is less time than it takes to do some harm to your body. So yeah, for safety and yeah for A to Z’s!
So true Sandra!
I love these, you did an amazing job building them! Does she happen to have plans for any other letters? 🙂
I have the plans for the “Z” that match my A in size (35″ tall) and Ana will soon post her original plans for the A and Z which are 29″ tall. I’m not sure if she plans to create plans for any other letters but it doesn’t hurt to ask, right?
What a cute project, and so hard looking. I’m not sure if my skills are up to is, but you did a great job.
awesome job!! I love these and great job on the carpentry part of these they must have been really hard to do!!!
Love these! What a great job you did. I do think you might want to paint the center of the A the same color as the wall so the A shape stands out a bit more.
Thanks Gayle! The original plans call for a hole in the center of the A. I opted out but can always cut one if I feel like it. For now, I like it as is :).
I can see why. It is so cute!
squealing. those are amazing!!!
I’m glad you like it Jennifer!
Wow, what a project, it came out great!!!
Thanks Jenn!
I love this and my two boys (both A’s) would too! If you ever feeling like making another (or 2) I’d love to buy them! (Also, I’m local:))
And rob you of the joy of making your own Heidi? *wink* I’m not planning on making these to sell anytime soon, but I’m flattered by the offer!