
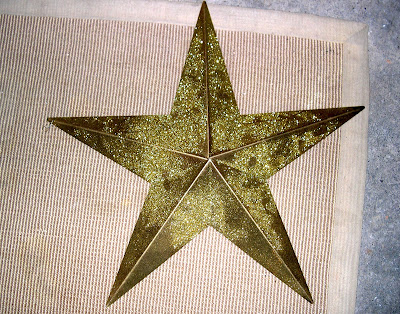
 Last Christmas, I saw these barn stars at 75% off clearance bringing them down to just over a dollar each. I wasn’t crazy about the solid gold dancer vibe they had going on, but I knew I could do something with them so bought all three. I redid one and hung it in my kitchen. The other two have been playing home to the spiders in my basement. Ew. Here is a BEFORE picture in all of its sparkly glory. Really this pic does not do justice to the glitteryness of these babies. They were glaring!
 I decided to google images of “barn star” to get some ideas of how I might want to restyle these guys. I should have known that The Nester would hold the answer to my question. She’s amazing isn’t she? For her full tutorial on distressing barn stars click here. My technique was a bit different, but she gave me a great place to start from.
 2. I mixed some browns and a yellow and streaked it over my white. I didn’t wait for anything to dry at all. I just went for it. I then added a dash of Tabasco sauce…no wait…I didn’t. I have no idea why that bottle is sitting on my counter. Hubby no doubt left it there :).
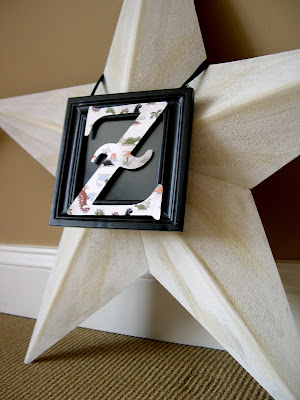
 3. I went back over some of the too dark areas with a brush of white and called it done. Here’s my finished star. It’s hard to tell from this picture, but some of the glittery wonder is shining through the paint which looks great.
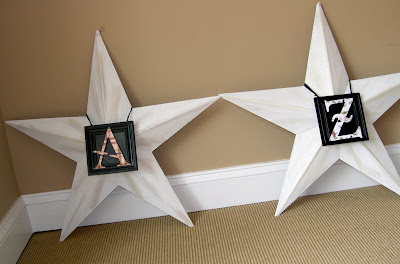
 These stars are going above my boys’ beds, so they needed something extra. You guessed it! An A and a Z. I’m obsessed and getting a bit predictable I’m afraid.
 5. I took those little Target frames from the $1 section that I’ve talked about before and simply stuck the letters to the outside. Why didn’t you put them inside the frame? Well because I thought they looked more intriguing on the outside, and because they were too big to go inside the frame :).


I love those stars! Really nice. I remember one year, I made my own stars like that out of aluminum flashing. They were much smaller, and I painted them and used glitter spray and gave them as Christmas ornaments. They were fun to make, but the folding of the flashing was a bit challenging.
Anyway…your stars reminded me of that. 🙂 Yours are great. I really like the way you antiqued them.
I love how those turned out. Barn stars are big in PA, just about every house has one. It's nice to see them repurpose for interior use. Thanks for sharing!
I have always been a fan of those stars! Hang a monogram on them and they are even CUTER!!
LOVELY!!!
~Andy @ poppiesatplay.blogspot.com
You are a genius! You really do lay awake nights and think of this stuff. . .amazing!
~ ~Ahrisha~ ~
those turned out great! i really need to find some of those.
Love how these barn stars turned out! I can't believe what a great deal you got…wow!
Love the monogram with the stars. I can't get enough barn stars. Love them.
Those look great. I love those stars esp. done in red, white and blue, but the added letters are such a great touch.
Pam
Beth, your barn stars are AMAZING!!! Love them! I have a tacky pinkish-red one that I need to redo for my baby boy's cowboy themed nursery – now you've inspired me =)
I am so sorry to hear about your dad. I hate cancer, I really do. I am praying for him and for you.
(((HUGS)))
PS – I didn't make the pillows this weekend – I took your advice and rested instead =) It's on my list though – thanks for the emails!
Heather
oh my, what a change, you would never know those were those gold things, just beautiful
Sorry…I meant to say enjoy your time with your dad. Unfortunately, this is something else we have in common. I can relate. I hope it goes well!
Oh gees…what a GREAT idea. I love spiffed up barn stars, and these are perfect.
I'm praying for you & your time with your daddy!
The stars are wonderful! Hope you have a good visit with your dad.