
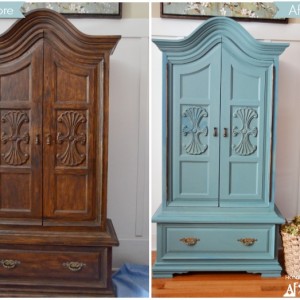
I have been very, very slowly making over my boys’ bedroom. I’m not sure why the heck this room is taking me so long, but I have to admit that I’m enjoying fussing over it at a leisurely pace! I think when it is completely finished it will be my absolute favorite room in the house. After repainting the walls, my next task was to update the boys’ furniture. We inherited these two dressers from Matt’s grandparents. I think it’s so amazing that my boys are using furniture that belonged to their great-grandparents! To give them a fresh look, I painted the dressers using Annie Sloan Chalk Paint and updated the hardware.

The card catalog brass label pulls were purchased from Vandykes.com. They cost me a little over $2 a pull, but the price seems to change weekly on all of their pulls so watch the prices before ordering. The shiny brass was just a bit too bright for me. To tone them down, I used Rub ‘n Buff in Ebony. You simply place a bit of the wax on a paper towel or rag and rub it on your item.

You can see the difference that the Rub n’ Buff makes below. The left pull has been coated and the right pull is in it’s original brassy state.

To create the labels, I cut out pieces from some string tags that I had on hand.

Instead of using a printer, I hand-stamped the words for my labels using a Martha Stewart stamp. I love the vintage typewriter-key feel that it gives the labels.

And here it is completely finished and looking good!

I didn’t bother filling the holes from the old hardware and just made new holes for the new catalog pulls. The pulls are larger than the original hardware so they nicely cover the holes and “hardware stain” that was left behind.

I am hoping that by having each and every drawer labeled my boys will be better about keeping their clothes organized! A mom can dream, right? 🙂

Here is a peek at how far this dresser has come.

I am thrilled with the end results of both dressers!

If you missed the first two-toned dresser tutorial which gives you chalk paint and shellac tips, you can find it by clicking on the photo below.


Where did you find those sailboat wall hangings? They are so precious!
Thank you! I found those years ago at Christmas Tree Shop.
Hi there! Love that dresser, did you do anything to the drawers? Strip, re-stain, top coat? Just curious, it is so beautiful!
Thanks! They were in pretty good shape so I just coated them with Shellac.
Thank you! I just gave my hubby’s dresser a re-do like this, but used Hemp Oil on the drawers, I am considering putting something like Shellac on though, just for a little more protection. Appreciate it!
I am truly inspired this. I love how you were able to give it a new life but preserve the character. If I may ask, what sources do you use to find hardware? I am om the hunt for hardware.
Not only is the dresser against the blue a stunning look, but those labeled handles are GENIOUS! I have five boys who ALL need dressers like this. Such a fantastic idea. Can’t wait to see the rest of the room.
Thank you Erika!
I love it! I’d love some similar pulls, but I can’t find them on the site. Can you give a link for me? It would be awesome… and I need some more organization in my life!!
Hi Heather, here is the link to the pulls I ordered: http://www.vandykes.com/brass-label-holder/p/203969/
Those are cute pulls! I used similar ones on the vanity redo I linked up last week! Found the ones I used on Etsy 5/$5.99!! Total card catalog style score!
http://www.dearemmeline.blogspot.com/2012/08/card-catalog-styled-vanity.html
wow, beth — that looks so amazing!! what a great piece for them to have….they are so lucky to have you and to have you care so much about their space!!
I agree with your sister 🙂 Your boys are so lucky to have such an awesome room! I love everything but especially the dressers. They look amazing next to the blue walls. Fabulous job, Beth. Every detail is perfection.
Awesome transformation. So lovely. Now I’m conflicted on the dressers I’m about to stain, should I change plans and paint like yours? Hmmmm.
Wow, that is gorgeous! Love the library pulls–charming and practical. Beautiful job. Wow.
Wow! that looks terrific! And, I’d never heard of Rub and Buff but the results are very cool. And best of luck with your plan for organized boys rooms…..it’s important to dream big.
The dresser turned out absolutely amazing! I love everything about it…the two tone, the pulls…all of it!
Thank you Shannah!
They both turned out just stunning! My nephews sure are lucky to have such a talented mommy! Great job Beth!
Thanks sis :)!
Beautiful! Got to pin it.
Bliss
that is an awesome dresser and it looks amazing with the white!!! good job, i just redid a dresser and it’s not that easy!
Wish Walker & Freddie could see these dressers now!! 🙂 Beautiful!
Hi Beh …love the new look you gave these dressers,never would of thought of doing itlike this…also like that chalk paint ,might have to look into it….by the way I love the pictures above the dresser….Happy decorating…enjoy,Susan
Thank you so much Susan!
Thanks Beth for using AMACO’s Rub ‘n Buff on your project. We love the shout out!
I posted this if that’s ok on our Rub ‘n Buff Metallic Finishes Facebook page with a link to your site.
Of course if your readers have trouble finding any of the 16 colors of RNB, they are always available on our website or AMAZON.com.
You’re welcome Becky! Love Rub n’ Buff :). Thanks for the shout out.
Absolutely gorgeous!! I am swooning over both of these! Awesome job girl.
Thanks love!
This is gorgeous! I love the transformation and the card catalog pulls!
Thanks you Katie!
So beautiful, Beth–and a great tip about the Rub and Buff on the hardware. I have a mirror that has a part I’d like to give a patina look to, and your idea might just work for that, so thank you for the inspiration!
I love using Rub n’ Buff to change the look of metallics. It works like a charm every time :).
Simply gorgeous, Beth! I love the transformation. (And the catalog pulls!)
Miss Charming » Thank you!
I LOVE this! I think I like it even better than the other one you did (and I loved it)!
Thanks Bethany! I think I like this one a bit better too.
The dresser looks amazing! I love the pulls. What color did you use on the wall? Loove it and would like to use it in my boys room.
It is Sherwin Williams Rainstorm in a flat sheen.
This dresser is unbelievible gorgeous. The painted frame of the dresser sets off the wood beautifully and against that dark blue wall it is yummy.
Thanks for sharing,
Traci
Thank you Traci!
Beth! This is absolutely stunning! Fabulous job, can’t wait to see the full space. And I totally know what you mean about making over a room ‘leisurely’, hopefully one of these days I’ll have another room reveal 🙂
I need to give myself a time limit and just get. it. DONE! I think once the boys go back to school it will be much easier to focus :).
What a neat job! So different, so interesting.
– The Tablescaper
Thank you!
Oh. My. Goodness. Stunning! I love that aged brass lately. Now if I only had a little boy who’s room I could decorate…
Beautiful! Love the two toned and those pulls are perfect. I love how the dresser looks in contrast with the bright blue wall!
I’m loving the blue walls as well. This room gets a lot of light so the walls look great and not too dark.
This is very beautiful. Great job and I love the Rub N’ Buff. I have hard time finding the Ebony around these parts.
Looks fantastic! Love this!
Thank you Anita!