

I have been on a very slow and thrifty mission to redo my dining room. That mission recently picked up some serious steam after seeing the dining room consultation that Layla from The Lettered Cottage did for Christy from Beach Brights. One of the elements I loved from Layla’s post were these Heather Chadduck inspired chairs. Here are Heather’s gorgeous chairs pictured below.
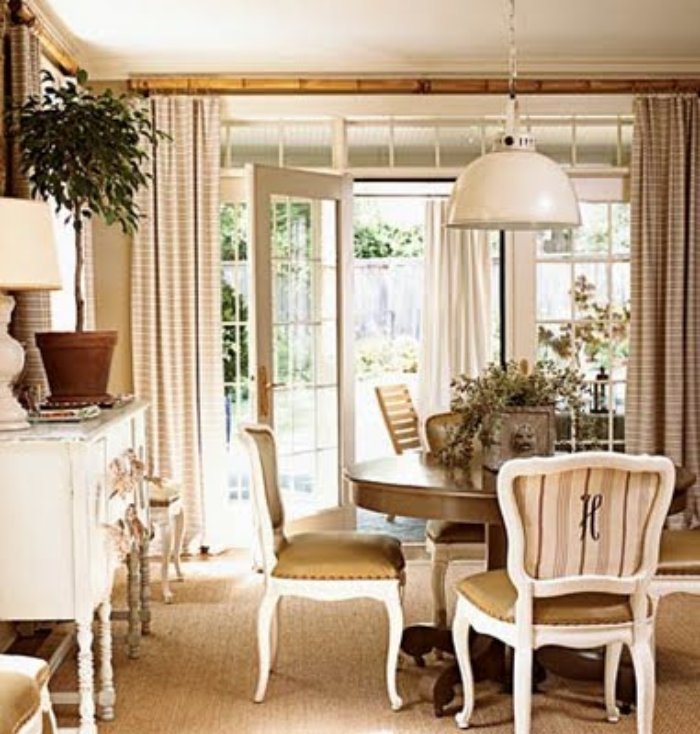
And just look! Heather was nice enough to monogram the chairs just for me. I love it when designers give customized inspiration, don’t you? In copying this look, I seriously toyed with the idea of taking some white spray paint to my arm chairs (armed chairs? No, that makes them sound like they drink Colt .45 and pack heat under their puffy coats… It must be arm chairs.) I may still end up painting them, but for now I’m too chicken. I am also too chicken to do anything permanent to the chair like nail into it. What can I say? I know myself well. I know that I am as fickle as a flirt when it comes to decorating. I dare say many of you are some flirty fickles as well! So my dear flirty fickles, please join me as I “MacGyver it” here and make my copycat chairs utilizing only what I have on hand.
Materials on hand:
- Foam board
- Staple gun
- Drop cloth/ burlap
- Painter’s tape
- Craft paint and foam brushes
- Ribbon
- Glue gun
- Chewing gum (just for pleasure, not necessary for the chair makeover but you better believe that in an emergency I totally would have used it! 🙂
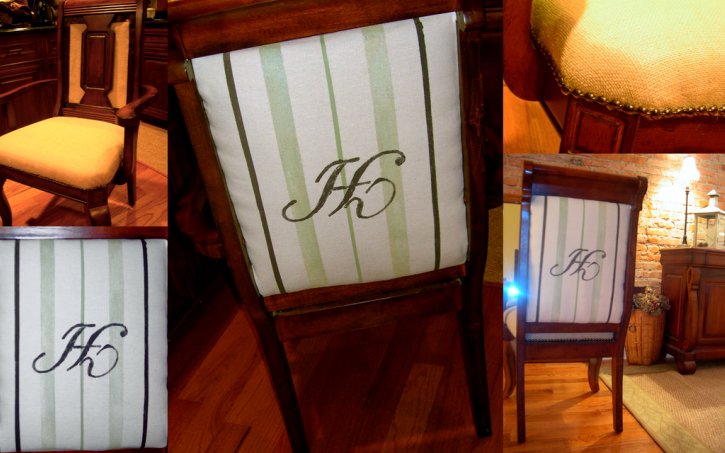
Pictured below is the chair waiting patiently for her salon treatment. The first order of business is recovering the seat cushion with some burlap. Because, really now, who doesn’t like to sit on scratchy, smelly fabric while dining? So sorry guests of mine, your bum will have to endure it because it’s cheap (the fabric…not your bum) and it gives me the look I am going for. If you are intimidated to recover your seat cushions, don’t be. Nothing could be easier. You just flip the chair back, unscrew the screws, cover the seat with your fabric, and staple the fabric into place. The corners can be tricky, but they’re not at all scary. Just pull, tuck, staple, and pull some more.
 I found some nail head trim for 70% off at Joann’s awhile back. Someone had opened the box and it was missing a few nails. I didn’t mind! This trim was so easy to use. You just popped an upholstery tack in place every couple of inches and you were done. So much easier than pounding each tack into place!
 Now that the seat is finished, we can move onto the back of our chair. I took a piece of foam board and placed it on the back. I then traced as best I could around the back of the chair. I cut it to size with an exacto knife and made sure it snugly fit. Below is a picture of my cut foam board.
 Next, I took some batting (from an old crib bumper–uh-huh, eat your heart out MacGyver) and cut it to the size of the foam board.
 I covered the front of the board with a piece of drop cloth and stapled it in place to the back of the board. Just wrap, tuck and staple all the way around. Then I used painter’s tape to mark off the areas for my stripes, took a foam brush with some craft paint (no, it wasn’t even fabric paint) and brushed it on.
 To create my beloved “H”, I made a stencil by printing an H in Edwardian Script onto some cardstock and cutting it out with a small exacto knife and scissors. Once my stripes were dry, I sponged some brown paint onto the stencil and created my monogram!
 On the flip side of the cushion, I used burlap stapled in place and trimmed it out with glue-gunned brown ribbon.
 That is it! Now all you do is push your cushion into place and enjoy!
 And if you’re wondering if I recognize that the quality of these photos is beyond terrible, why yes, yes I do. Thanks so much for pointing that out :). Ugh. You’ll have to just use your imagination and pretend that it looks crisp and clear and amazing.
Linking up with Met Monday, made it with what I had, and DIY Day and Transformation Thursday.
Related Posts


Those chairs are genius and the fabric is PAINTED! Love it! I lvoe your inspiration photo as well. I clipped that same one a few years ago. I love that style. Thanks for linking up and sharing all of the details with us.
I always love a monogram!
Love it! I am also a big fan of Heather's room!
Now I am off to look at your other stuff!
Smiles~ Michelle
@Cheap Chic Home. You turned those chairs into a nice set. I especially like the nailhead trim.
Beth you did an AMAZING job!! I LOVE the monogram!♥
~TidyMom
wow , that is so creative and they came out great!!
Beth, This is truly amazing! I love anything with a monogramm…your chairs came out beautifully! I'm linking up my recent Staircase post tonight…yipee! 🙂
Very Nice. I enjoyes the visit.
Really fantastic! I love the monogram, like you're the queen of the table 🙂
Super job. Anything monogrammed is just wonderful, but you outdid yourself on this one.
You are just too funny! I really enjoyed reading your post. Oh, and the chairs didn't turn out half bad.
Who am I kidding. The chairs turned out fabulicious!!!
They turned out so great! That monogram just makes them look so custom!
I just love your chairs, they are wonderful, I too love to paint fabric, I do it on duct cloth and use it for throw pillows, happy someone else knows those little secerets, love your blog, love the detail and lots of pictures, I am a new follower, come for a visit
Found you on Dayka's blog. Great work. Can't wait to read your older posts.
Lovely, lovely! I'll be at the party!
They look great – what a wonderful re-do!
Fabulous! Way to be brave… and not tooo risky at the same time. I like them not painted white, and the new look makes them pop anyway!
Of course you know if I was ever in your area I'd be trying to meet up! Great job on the chairs!
Love them – you did great!
Wow. Awesome looking chairs. Found you through Cottage Instincts. Love your blog.
What a great project! I'm tempted to make some slip covers for my dining room chairs and monogram them. You may just be the inspiration needed! Thanks!!! ~ Sarah
Wow Beth! I've always loved those Heather C. chairs (and the monogram works for my name too!). Love your knock offs. I can't believe you cut that stencil out…it looks so smooth. I thought I was going to have to be jealous of yet another cricut-user 🙂
Thanks for linking up…
peace.
Love these! I am a sucker for anything monogrammed!
This is amazing! I like how you even took the "H" and turned it upside down – it's much more unique than the traditional way. You're sooooo creative! 🙂
Thanks for sharing…especially the details.
shut all the way UP! you even made your own fabric design?? too talented for words. your chairs look amazing. great job!
Awesome. How pretty it is. Inspiring!!!
Great job. I love the whole McGyver attitude. Using what you have is the best way to get things done cheaply but chic-ly. Thanks for sharing.
FABULOUS Beth. I hope you will post to Its So Very Creative as well. I just love them and I don't think I would paint the chairs I love the contrast.
Cheri
the chair looks beautiful! can't wait to stare at the staircase!
Meg 🙂
Oh I love McGyver! Those where the days. But I love you more. Great job on the chairs! you fickleminded, chaircovering, monogramming clever woman.
I don't even know what to say. I am finally rendered speechless. You're brilliant! Brilliant!
Wow!! Good job!
Thanks for the reminder for your party. I may need another one!! hehehe! 🙂
Linda
amazing job! the fabric stripes & of course the monogram looks FAB-U-LOUS!
This looks great, Beth! I'm so glad you posted this tutorial ~ I'm going to use your initial stencil idea because I have a lamp shade I'd like to monogram and I was trying to figure out how to get one on there.
Your guests will be so impressed with the back of the chair they will forget their itchy bottoms 🙂 Great job and very clear tutorial! Love the chairs! Thanks!
Very clever. Great job!
Found you through Hooked on Houses! and have added you to my list of favs!! I'll be giving you a shout out this week and will be back to leave you the link! Cannot wait to settle in and read these posts!! Loved what you did with your bedroom and books!!
I've said it before but I love 'em! You make it look so easy too, that I love even more!
See you at the party! Can't wait!
Rachelle