
Welcome to those visiting from Dimples & Tangles! This week, Lindsay from The White Buffalo Styling Co. is hosting the Blogger Stylin’ Home Tours – Favorite Room Edition and asked me to share my favorite room. It’s a great dilemma to have when you like so many rooms in your home that you have difficulty picking just one! This wasn’t always the case, and today I want to share with you how I transformed our kitchen from a space I disliked into a space that I adore!

How to Update Your Kitchen on a Budget
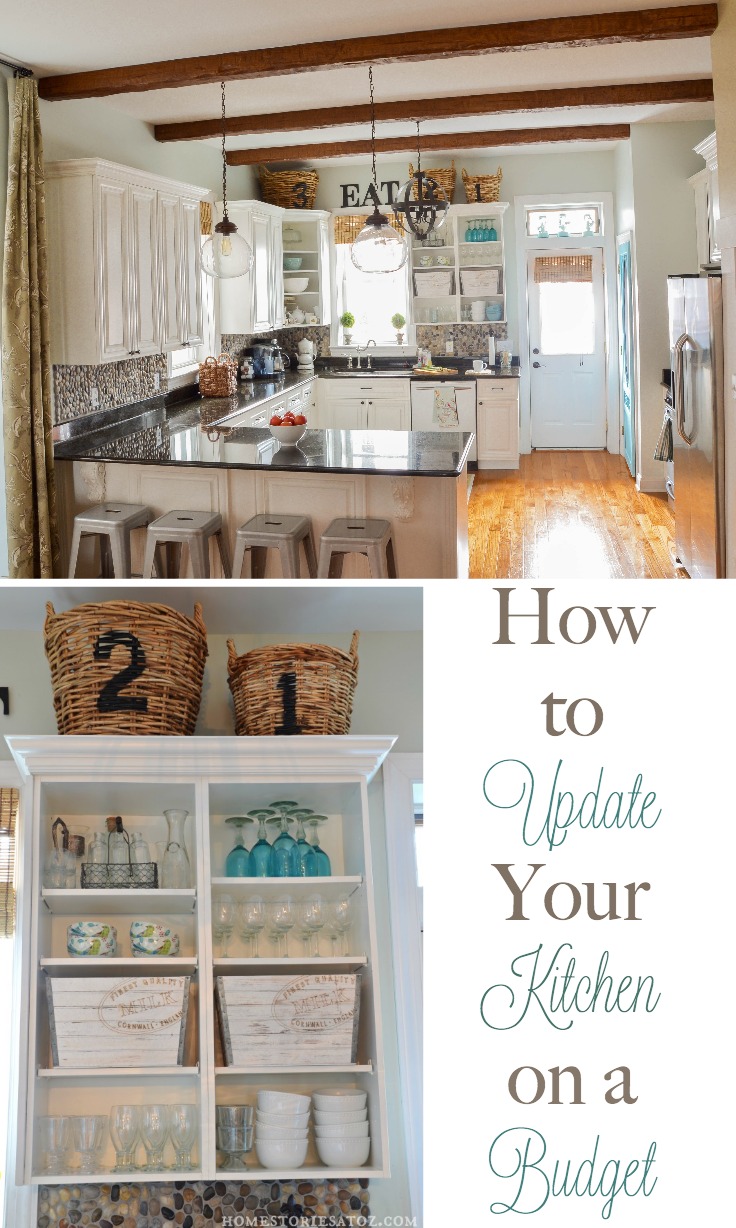
The kitchen truly is the heart of the home! Don’t believe me? Try throwing a party and see where everyone in the house tends to congregate–even when you have an open concept floor-plan. Real estate trends continue to show that updating the kitchen will give you the most return on your dollar. So if you are tired of your lack-luster kitchen, you can rest assured that updating your kitchen is a wise investment! Here are 5 easy ways to bring your kitchen up to date without breaking the bank.
1. Paint Your Cabinets
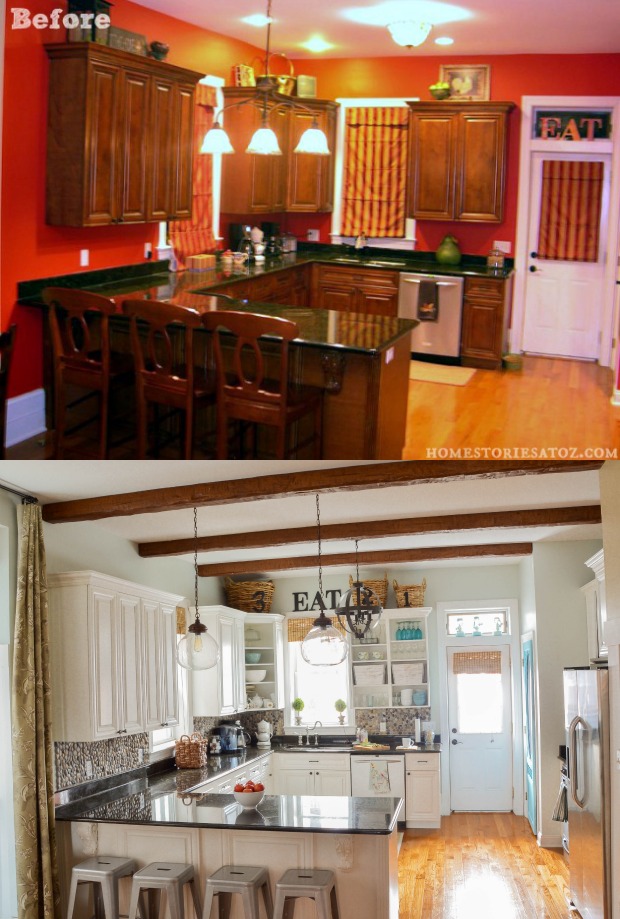
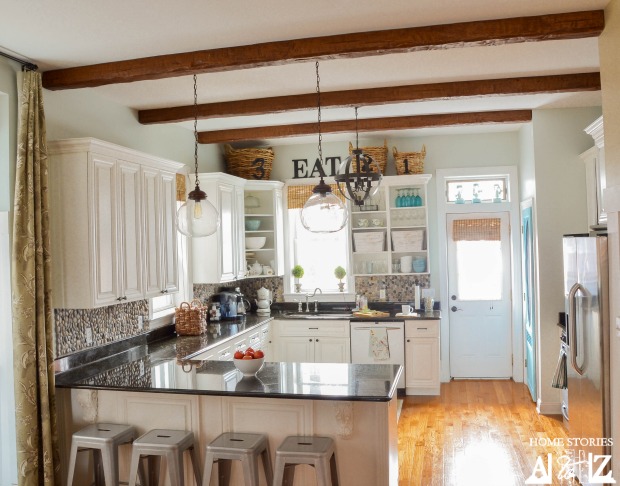
I never cease to be amazed by the transformative power of paint. Hands down this is the easiest way to give your kitchen a brand new look. When I designed our kitchen back in 2006, I was obsessed with rich woods paired with vibrant reds, golds, and greens. I chose to paint the kitchen Benjamin Moore’s Million Dollar Red, and at the time loved my kitchen’s cozy, warm, coffee-house feel! However, a year later I hated it. The vibrant red was INTENSE and overstimulating. Instead of making me feel warm & cozy, I found myself feeling irritable and stressed-out by the color. I was so upset that I had made the “wrong” decorating choices and felt stuck with my selections. It took me several years to get over this unnecessary guilt and get brave enough to do something about it. Finally, I summoned the courage to grab a paint roller and change the wall color to Sherwin Williams Sea Salt. I then became even braver and painted the cabinets Benjamin Moore’s White Dove. Lo and behold all was right with the world again! I only wished I had done it sooner. If you hate your current kitchen color choices, just paint over them.
2. Remove Kitchen Cabinet Doors
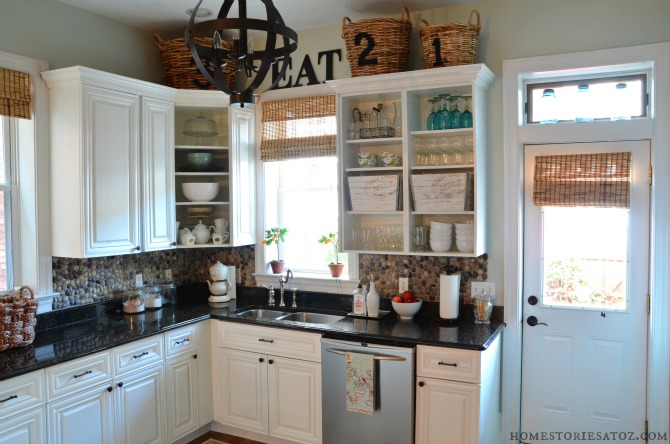
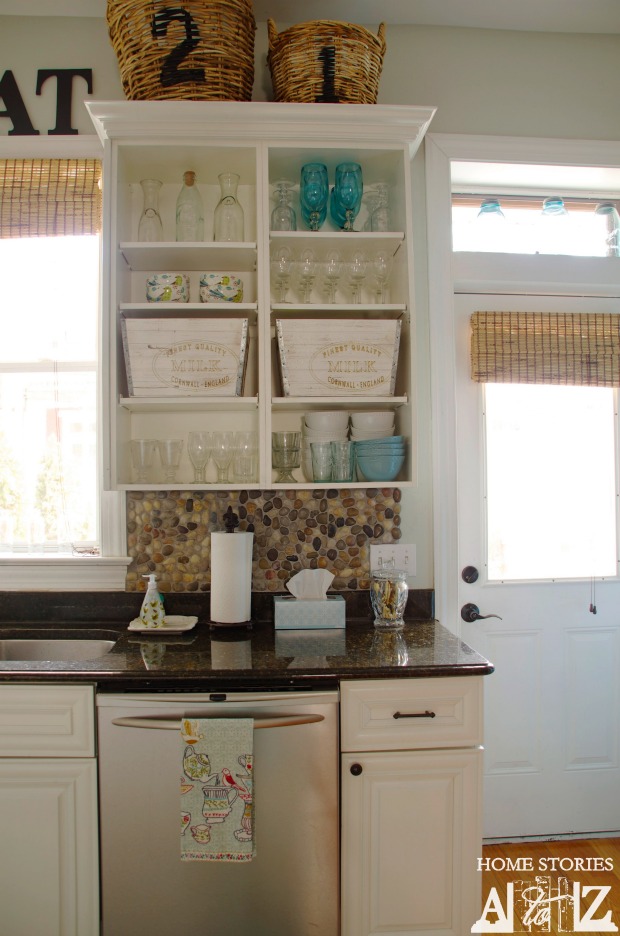
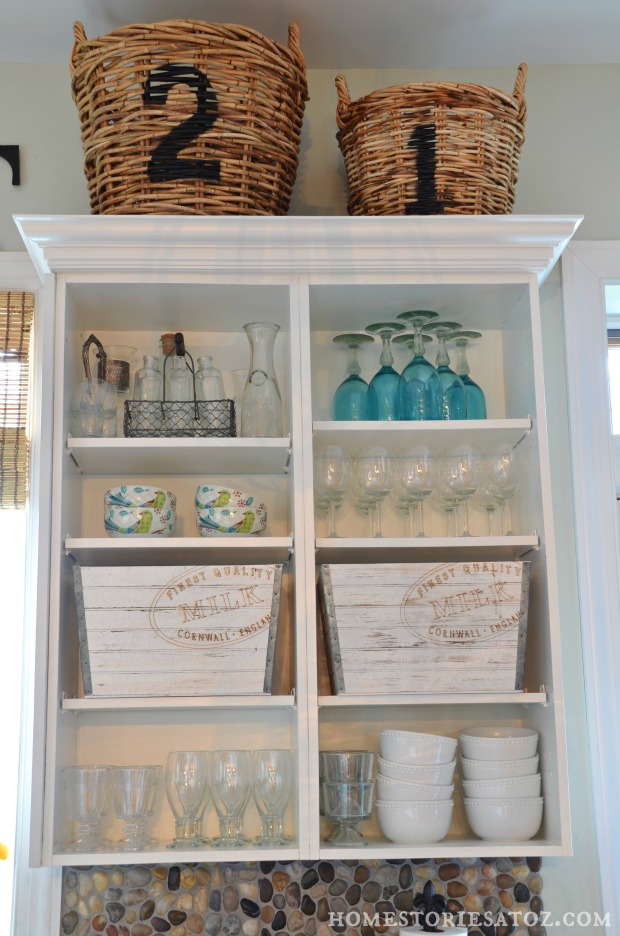
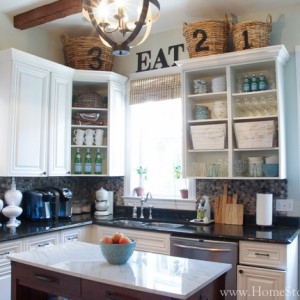
Open shelving in kitchens is an enduring trend that gives the space instant character. When making over my kitchen, I considered removing a few of the cabinet boxes and replacing them with shelves. However, that seemed like such a waste of perfectly good cabinets! In the end, I decided to remove three cabinet doors creating an open-shelf look without any of the commitment. The painted doors are stored away in the basement and can be reattached at any time.
3. Style Your Space
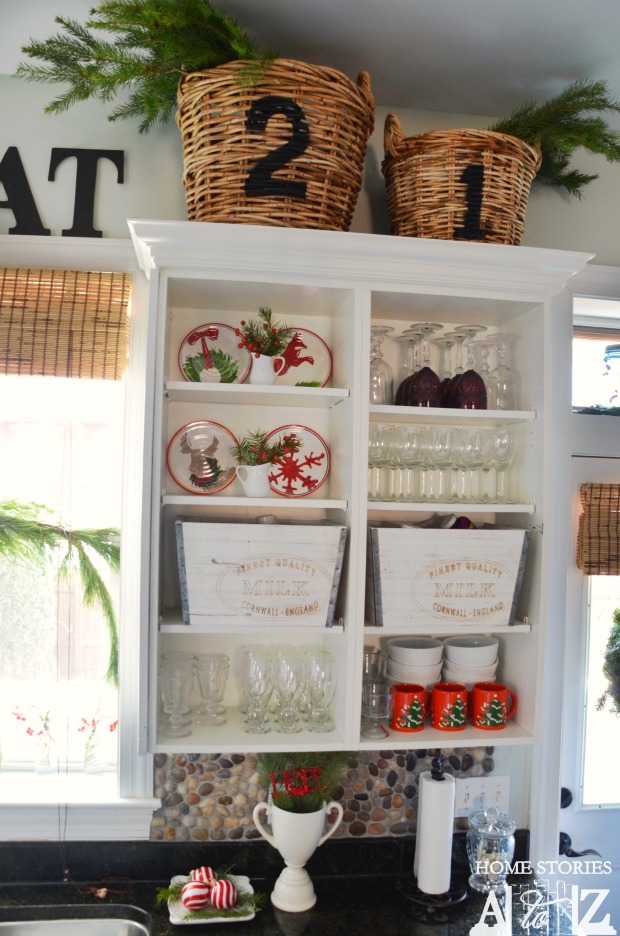
Styling your kitchen is an incredibly inexpensive way to make your kitchen your own. Even if you are renting or can’t afford to remodel, you can probably afford some decorative baskets, crates, dishes, and dish towels. Open shelving gives you the added bonus of being able to display your dish collections, accessories, and seasonal decor. If you have that awkward space above your cabinets, consider finishing them off with crown molding and using a minimalist approach to decorating up there. Too many baskets and objects tend to give a cluttered look, so keep it simple with a few items in a monochromatic color palette.
Below you can see how I changed our shelves for Christmas! It’s really fun to be able to change the shelves with the seasons.
4. Update Your Lighting
When I couldn’t afford to change out our dated tiffany-light fixtures, I chose to DIY a temporary solution. Using the existing fixtures, I attached lanterns as globes and a drum shade to the flush-mount fixture. Sometimes you just have to get creative and find ways to improve upon what you already have!
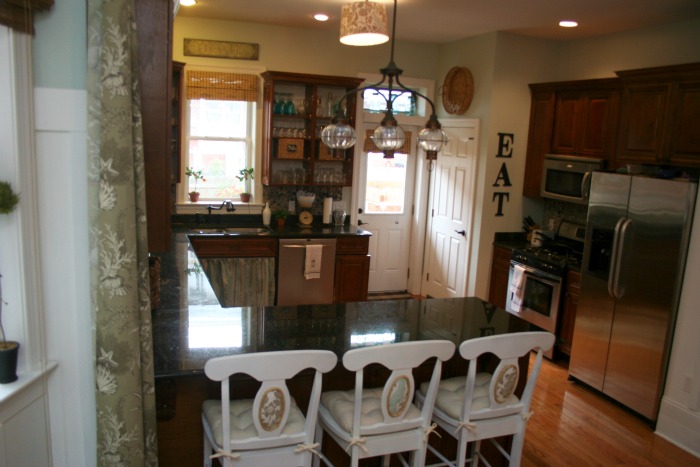
When new lighting became an option, I chose lights that complemented the casual cottage feeling I was going for.
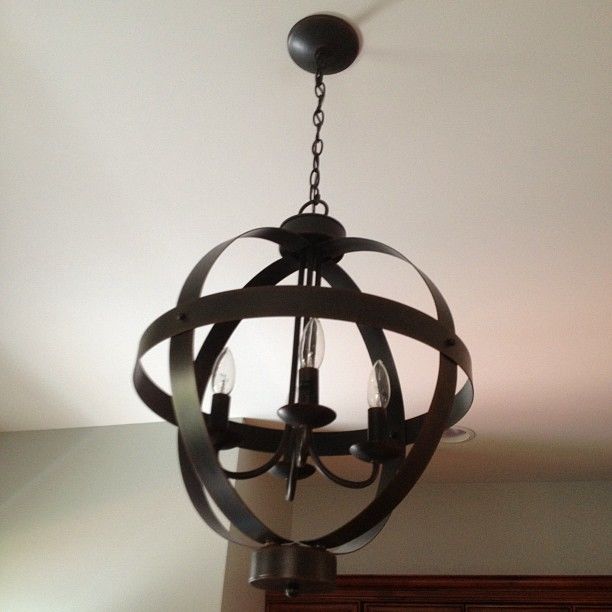
Lighting and hardware are the jewelry of your kitchen so choose them wisely!
5. Update Your Backsplash
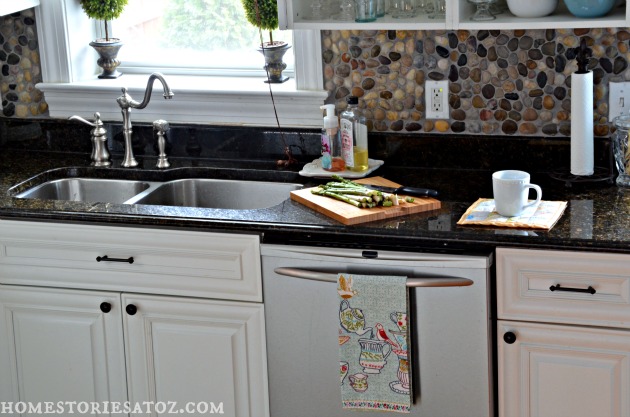
Out of all the updates we made to our kitchen, our garden stone backsplash is THE ONE I am most proud of! I found these boxed squared tiles in the garden center of a discount store. They were labeled as stepping stones, but the river rocks were all attached to a mesh tile backing. I honestly don’t know how they were originally meant to be used, but when I saw them they screamed “kitchen backsplash”!
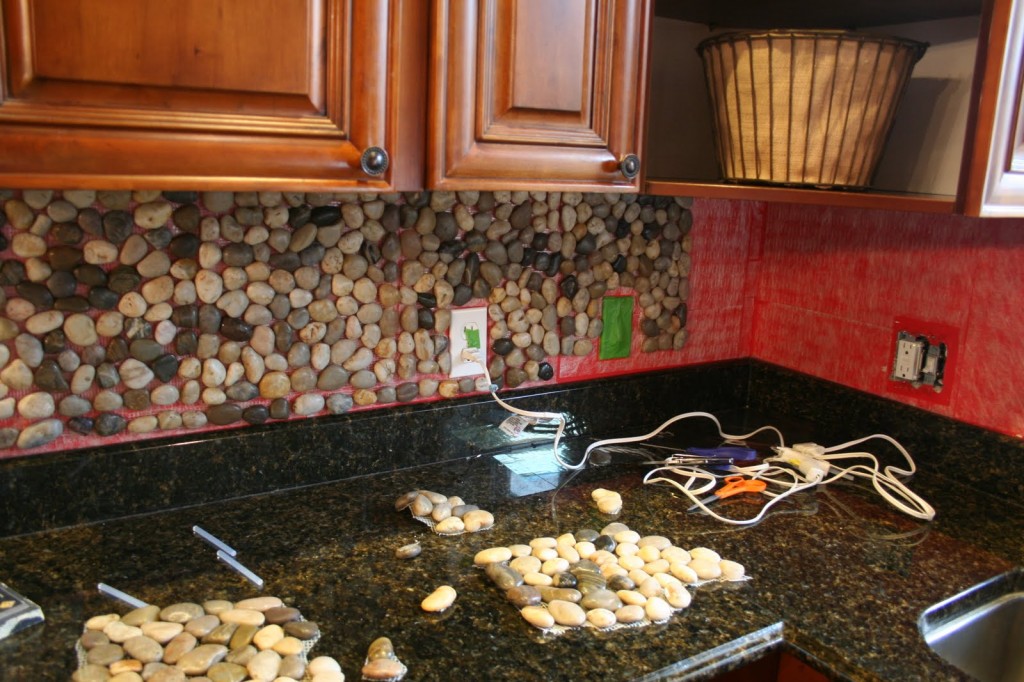
For about $75 in stones, grout, and sticky tile mat, I was able to achieve a unique and gorgeous backsplash. Don’t be afraid to think outside the box when carrara marble subway tile just isn’t currently in the budget!
And here is one more reminder of what this space looked like before and after!
Thanks so much for stopping by and checking out my favorite room! The next stop on your Blogger Stylin’ Home Tours – Favorite Room Edition is Desert Domicile.


HI, I love those baskets too! Where are they from or did you just stencil them yourself?
Thanks Julia! Those baskets were from Target from several years ago. I think you could easily achieve a similar look with paint and a stencil.
Darn 😉 I’ll look for something similar. Thanks for your response and for sharing your style and creativity with others!
Beautiful transformation! You didn’t say anything about the wood beams. Where did you get them? And how tall are your ceilings? I want wood beams but my ceilings are 8 feet so I’m really doing my research.
I was thinking the same thing Karina. Beth do you have any insight on this?
My ceilings are 10ft tall, and the beams are faux. I have a post on the beams here if you’re interested: http://www.homestoriesatoz.com/kitchen/home-stories-a-to-z-kitchen-with-az-faux-beams.html
I absolutely love the lights over your bar in the kitchen. Our kitchen is set up very similarly and I want to do some updates (lighting, paint cabinets white, etc). Would love some input on where to look for lighting like you have! Thanks!
Hi! Thank you for the awesome idea of stepping stones for a back splash! I am just wondering how you did that process a little more. My husband and I are undertaking it also.
Thank you!
Sure! Here is the tutorial I wrote back in 2011. The video is no longer working for some reason, but in it I simply showed how to use the sponge to gently “carve” around each stone when wiping away the grout. You don’t want the stones to look buried in the grout so depending on how heavy handed you are with your grout it might require a lot of grout removal to get the look you want. http://www.homestoriesatoz.com/uncategorized/garden-stone-kitchen-backsplash-tutorial-how-to-backsplash.html
We just bought a new house and I really dont care for the small galley kitchen, not really any charm or character to it, but your udea of painting the inside a nice white and removing the doors will add more of the character, depth and color by displaying my colorful old bowles, baskets etc. and changing the contents to match the season is a great idea. think ill try that until I can afford to change them. Thanks so much for the inspiration.
You’re very welcome! Glad you found it helpful.
Hello! I LOVE your kitchen reno. It’s so perfect! My husband and I are going to be taking the plunge and painting our cabinets white soon. Where did you get your pendant lights? Thanks so much! -Ashley
Great points, never thought of completely removing some of our cabinet doors, but I just might try it!
This is very interesting, You’re an excessively skilled blogger.
I’ve joined your feed and sit up for seeking more of your wonderful post.
Additionally, I’ve shared your website in my social networks
Beautifully done! I was wondering where your lighting came from? Thanks so much!
wow those few updates made all the difference. I just watched a Lowes how to video on installing a back splash, so we can update ours. They used what looks like the exact same stone. Its beautiful!
-Shonee
http://www.hawthorneandmain.com
Thanks Shonee!
it’s fabulous! those pendant lights are my favorite- beautiful kitchen, beth!
I pinned your kitchen months ago and am using it as inspiration to paint my kitchen cabinets! It is amazing the transformation paint can make!
Thanks so much for the pin! And yes, paint is amazing. 🙂 Thanks for visiting me.
Such a dramatic change! Love how light and airy it is now 🙂
What an amazing transformation! I have Sea Salt in my kitchen and living room too and I love it. You open shelving is awesome and the backsplash too! Love!
Thanks so much Summer!
Wow – these are amazing tips, especially for how little money they cost to implement compared to other options
Love those baskets and the pendant! Your entire kitchen is SO inviting!
Thank you Amber!
I LOVE those stenciled baskets!! Such a sweet space =)
Thank you Carrie. 🙂
Wow, what a transformation! I love that you used river rocks for your backsplash – so clever!
Thanks Caitlin!
I LOVE your pretty kitchen! So much charm and that before & after is crazy! Thanks for joining in, Beth!
Thanks so much for inviting me to join in!
What a transformation!!!
Your kitchen is gorgeous, Beth. What a dramatic before and after!